")
")
")
")
")
")
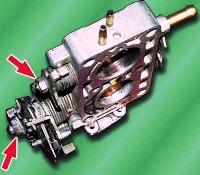
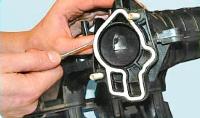
Disassembling the carburetor K-151, K-151D
It is not recommended to unscrew the screws securing the throttle valves on the axles and remove the dampers unless absolutely necessary, as their displacement can lead to jamming of the dampers in the channels
- Carburetor K-151 adjustment
- Removal and installation of camshafts ZMZ-409
- Description of the assembly of the ZMZ-402 engine
- Features of the cooling system D-245
- Removal and installation of the crankshaft ZMZ-402
- Installation of pistons and rings diesel D-245
- Repair of the oil pump ZMZ-409
- Repair and replacement of the ZMZ-406 piston engine
- Adjustment of the ignition moment of the ZMZ-402 engine
- Installation of cylinder head and valve mechanism D-245
- How to remove and install the cylinder head ZMZ - 402
- Removal and installation of the ZMZ-406 alternator belt
- Removal and installation of the ZMZ-402 engine distributor
- Fuel system of the ZMZ-402 engine
- Removal and installation of the ZMZ-406 engine
- The sequence of disassembly of the ZMZ-402 engine
- Engine design ZMZ-406
- Removal and installation of fan belt ZMZ-402
- Lapping of valves ZMZ-402
- Removal and installation of the ZMZ-402 engine
- Fuel pump engine ZMZ-402
- How to replace the cylinder head cover gasket ZMZ-406
- Exhaust gas recirculation ZMZ-402
- Checking the camshaft position sensor ZMZ-406
- Diagnostics of the engine management system ZMZ-406
- Engine lubrication system ZMZ-402
- Engine management system ZMZ - 405, 406
- Engine design ZMZ-402
- How to replace the valve seals of the ZMZ-405, ZMZ-406 engine
- Checking the performance of the ZMZ-406 injector
- Replacing the alternator belt ZMZ-402
- Checking high-voltage wires ZMZ 406
- How to set the TDC of the ZMZ-405, ZMZ-406 engine
- Replacing the oil filter of the ZMZ-402 engine
- Replacement of the cylinder head gasket for the ZMZ-405, ZMZ-406 engine
- Mass air flow sensor ZMZ 405
- Hydraulic chain tensioner for engine ZMZ-406
- Replacing the nozzle ZMZ 406
- How to replace the timing chains and gears of the ZMZ-405, ZMZ-406 engine
- Checking and replacing ignition coils ZMZ-406
- Possible malfunctions of the VAZ-21126 engine
- Malfunctions of hydraulic pushers VAZ-21126
- Running-in engine ZMZ-402
- Assembly and installation of the boost corrector D-245
- Malfunctions of the VAZ-2123 engine
- Diagnostics of the state of the ZMZ-402 engine
- Assembly of injection pump 4UTNI-T-1111005-50 diesel D-245
- Possible malfunctions of the ZMZ-406 engine