")
")
")
")
")
")
Disassembling the carburetor K-151, K-151D
It is not recommended to unscrew the screws securing the throttle valves on the axles and remove the dampers unless absolutely necessary, as their displacement can lead to jamming of the dampers in the channels
The brass connecting tubes of the channels pressed into the body should not be removed in order to avoid violating their tight fit.
The carburetor should be disassembled only as a last resort, if flushing and blowing with compressed air without disassembly does not eliminate the sticking of the throttle and air dampers and does not lead to complete cleaning of the jets and channels from deposits.

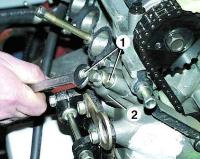
Disconnect the air damper rod 1 from the profile lever by removing the cotter pin 2 from the hole on its bent end.

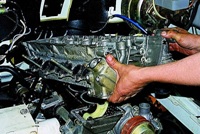
Remove the seven screws securing the cover to the body and remove the carburetor cover.

Unscrew the two screws securing the throttle body and, disengaging the connecting earring, remove the body.

Unscrew the three fixing screws 1 and remove the cover 2 of the vacuum diaphragm of the carburetor starter.

On the reverse side of the carburetor cover, disengage the bent end of the carburetor trigger diaphragm rod from engagement with the trigger lever.

Remove diaphragm 1 from the carburetor cover.
Disconnect choke spring 1 from cover pin.
Unscrew the two screws 2 fastening and remove the cover 3 of the ventilation channel of the float chamber.
Remove the screw 4 fastening and remove the atomizer 5 econostat.

Remove the fastening screws and remove the starter drive levers

Carefully remove the heat-insulating gasket from the bottom flange of the housing.
Unscrew two fixing screws 1 and remove the microswitch 2 of the EPHX system.
Remove cotter pin 4 and remove damper control lever 3 together with profile lever 5 from the shaft.

Unscrew plug 1 of the float axis hole with a screwdriver and remove the aluminum sealing washer located under it.

Using tweezers or round-nose pliers, remove the float shaft and remove float 4 and needle 3 of the shut-off valve.
Unscrew seat 2 from the carburetor body.
Remove the four screws 1 fastening and remove the cover 2 of the accelerator pump together with the lever

Remove the accelerator pump diaphragm and the release spring located underneath it

Unscrew hollow fuel supply bolt 1 and remove it together with manifold 2 and aluminum sealing washers 3.
Remove the fuel supply screw 1 from the manifold 2 together with the strainer and remove the aluminum sealing washers 3 from it.

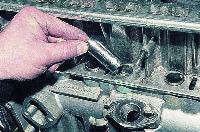
Unscrew the drain plug with the sealing washer from the wall of the float chamber.

Using a carefully selected screwdriver (to avoid damage to parts made of brass), unscrew the air 3 and fuel 2 jets of the main metering system, air jets 4 and 5 of the idle and transition system from the body.
Unscrew the screw plugs 1 located on the sides of the housing and unscrew the fuel jets of the idle system and the transition system located under the plugs.
Unscrew the hollow fuel supply screw 6 fastening the accelerator pump nozzle and remove the nozzle 7 together with the sealing aluminum washers.

Unscrew the three fastening screws and remove block 1 EPHX together with the sealing gasket from the carburetor body.
If it is necessary to replace the EPHX diaphragm, unscrew the four screws securing the EPHX valve and remove the valve assembly.

Then, carefully separating the valve cover from the diaphragm, remove the diaphragm together with the spring from the valve body.

To disassemble the throttle actuator mechanism, you need to unscrew the nuts securing the drive parts on the damper axles, having previously marked the location of the parts on the axles, and remove the parts.
After dismantling, wash the carburetor parts in gasoline or thinner, then blow out all the channels in the carburetor parts with compressed air.
Assembling the carburetor
The assembly of the carburetor assemblies and the carburetor itself as a whole is carried out in the reverse order of disassembly, taking into account the following:
It is necessary to check the mating surfaces of the throttle body for nicks and cracks.
Check the ease of turning the shutters in the housing and the clarity of their return to their original position after removing the force.
Check the mating surfaces of the carburetor body for nicks and warping in the area of the holes for the mounting screws.
All cardboard, paronite and rubber gaskets must be replaced with new ones.
The screws connecting the carburetor body parts should be tightened tightly, but without excessive force, which could lead to deformation of parts made of soft alloys.
The nuts securing the carburetor to the engine intake pipe should be tightened without excessive force and only on a cold engine.
After assembly and installation, the carburetor must be adjusted.