")
")
")
")
")
")
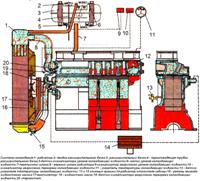
2108 carburettor disassembly
It is necessary to disassemble the carburetor only when it is necessary to wash and blow out the carburetor, as well as in case of fault detection.

Unscrew the solenoid valve.
Remove the fuel jet from the valve body.

Remove the five screws securing the carburetor cover, and remove it.

Using a thin screwdriver or wire, push out the axis of the floats.

Remove the axle and remove the floats.

Carefully remove the carb cap gasket.

Unscrew the needle valve.

Remove the four screws securing the starter cover.

Remove the diaphragm cap.

Carefully detach the diaphragm from the cover and remove the diaphragm spring.

Remove the fuel filter cap.

Remove the cork with the filter inserted in it.

If you need to remove the choke lever, carefully unscrew the axle, while removing the locking ball with a spring from under the lever, and remove the lever.

Carefully pry off the accelerator pump injectors with a screwdriver and remove them.

Remove the four screws securing the accelerator pump cover and remove it

Remove the accelerator pump diaphragm and spring

Remove the three screws that secure the power saver cover.

Remove the economizer cover, spring and diaphragm.

Remove the plastic disposable plug (if installed) and unscrew the mixture quality (composition) adjustment screw.
You can remove the plug with a corkscrew.

Unscrew the two emulsion tubes structurally integrated with the main air jets

Remove the emulsion tubes.

Unscrew the main fuel jets installed in the wells of the emulsion tubes.

Turn the carburetor body over and shake out the main fuel jets.

Remove the screw securing the wire, gently pressing the tabs of its tip, remove the wire from the shank of the sensor-screw for adjusting the amount of mixture and unscrew the adjusting screw for the amount of mixture
Assembling the carburetor
The marking of jets is determined by the flow rate, which is measured using micrometers.
The micrometers are adjusted according to the reference jets.
The conditional consumption of the fuel jet is determined by the reference jet using a special method.
It is not subject to control during operation.

The float should rotate freely, without jamming, on the axis and not touch the walls of the float chamber.
If not, adjust float

The valve needle must move freely in the socket.
Valve seat tightening torque 15 Nm (1.5 kgfm).

Solenoid valve tightening torque 4 Nm (0.4 kgfm)

Install the jets in accordance with the markings on them (see "Carburetor calibration data").

If the air damper actuator lever was removed, apply UG-9 type sealant to its end face and upper threads before screwing the lever shaft in.

When assembling the accelerator pump, screw on the cover fastening screws, press the pump drive lever all the way down and in this position finally tighten the cover fastening screws.
Adjust the trigger and check the operation of the second chamber lock mechanism.