")
")
")
")
")
")
You will need: keys "for 10", "for 13", "for 14", "for 17", "for 19", "for 21", "for 22", "for 36" (or a special key for the crankshaft pulley fastening nut, in the absence of such a key, you can use a gas wrench),
socket heads "for 12" and "for 13" (or a special key for the cylinder head bolts), a screwdriver, a hammer, an oil filter extractor
If possible, work on a special turntable that provides access to the engine from all sides, as it is very difficult to fix the engine from moving when unscrewing fasteners tightened with a large torque.
- 1. Remove the engine from the car.
- 2. In the same way as it was done on the engine installed on the car (excluding operations for disconnecting wires, pipelines and attachments), do the following:
- - remove the oil filter;
- - remove the clutch;
- - remove the flywheel;
- - remove the cylinder head (see "How to replace the cylinder head gasket VAZ-2123").

- 3. Unscrew the three bolts securing the coolant pump housing to the cylinder block and remove the pump assembly with a pulley.
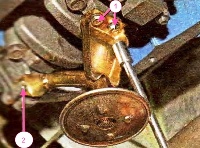
- 4. Loosen the low oil pressure warning light sensor while holding the adapter from turning and unscrew the sensor.
- 5. Remove the camshaft drive chain tensioner shoe (see "Replacing the VAZ-2123 chain tensioner shoe")

Slide the crankshaft sprocket with a screwdriver and remove it.
Unbend the edge of the lock washer, unscrew the bolt securing the oil pump drive shaft sprocket and remove the sprocket.
Remove the camshaft drive chain.

Remove the mounting hole plug in the cylinder block.
Remove the crankcase breather cap.

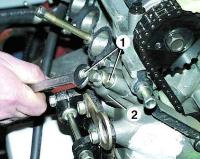
Remove the two bolts securing the thrust flange of the oil pump drive roller, slide the roller forward and remove it.

Pry off the oil pump drive gear with a screwdriver and remove it.

Remove the two nuts securing the front cover of the clutch housing and remove the cover

Remove the two bolts securing the oil pan to the crankshaft rear oil seal holder

- six bolts securing the holder to the cylinder block and, gently prying with a screwdriver, remove the gland holder.
Be careful not to lose the two square head bolts securing the front clutch housing cover. They are freely installed in the sockets of the holder and fall out easily

Remove the remaining oil sump bolts, washers and oil sump.
If the oil pan gasket remains on the cylinder block, remove it.
Remove the two oil pump mounting bolts and remove it.
If the oil pump gasket remains on the pump, separate and remove it.
Before disassembling the crank mechanism and the piston group, mark the pistons, connecting rods, main and connecting rod bearing shells in order to install them in their original places during assembly, if they are operational.

Screw the two nuts onto the oil separator mounting stud and tighten them together.
Unscrew the hairpin.

Remove the bolt that secures the oil separator drain tube bracket and remove the bracket by sliding it all the way along the tube.

Remove the oil separator with drain tube.

Remove the two connecting rod cap nuts on either cylinder.

Pry off the connecting rod cover from the seat with light blows of the hammer and remove the cover with the liner

Press the wooden block (hammer handle) on the connecting rod bolts
The numbers of the cylinder in which they are installed are stamped on the connecting rod and connecting rod cap.
The connecting rod caps are not interchangeable (the connecting rod is processed together with the cap).

When assembling, the numbers (cylinder numbers) on the connecting rod and the cover must be on the same side.

Remove the piston with the connecting rod from the cylinder towards the upper plane of the cylinder block.
Similarly, remove the pistons and connecting rods of the remaining cylinders, turning the crankshaft to access the nuts of the connecting rod caps
Turn the crankshaft with a wrench by the flat on the front end.

Remove the two bolts securing either main bearing cap
Separate the cover from the seat with light hammer blows and remove the cover with the bottom insert

Main bearing caps are designed for one specific cylinder block only (caps are machined with the block).

The covers are not interchangeable with each other.
The covers are marked according to the order in which they were installed, counting from the front of the engine.
Remove the remaining main bearing caps and remove the crankshaft.

Remove the rear thrust half ring (sintered, yellow) of the rear crankshaft support,

- front thrust semi-ring (steel-aluminum) of the rear crankshaft support, all upper crankshaft main bearing shells, shells from all connecting rod caps, lower shells from all crankshaft main bearing caps, shells from all connecting rods.
If the connecting rod bolts are not damaged, they can not be removed from the connecting rods.

Uncompress the top compression ring and remove it. Remove the rest of the rings in the same way
Remove the piston pin circlips by prying them out with a pointed tool

Push the pin out of the piston bosses and the connecting rod.
Mark the details. If they are not damaged and slightly worn, they can be used by installing them in their original places.

Remove the key from the slot in the front end of the crankshaft.