Loosen the alternator mounting bolt, unscrew the nut and remove the generator bracket No. 2
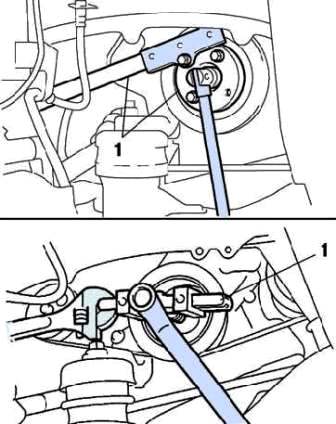
Hold the crankshaft pulley with special tools 09213-54015 and 09950-50013, unscrew the pulley mounting bolt and remove the pulley (fig. 1).
Remove the four bolts and remove the #1 timing belt cover.
Remove the timing belt guide.
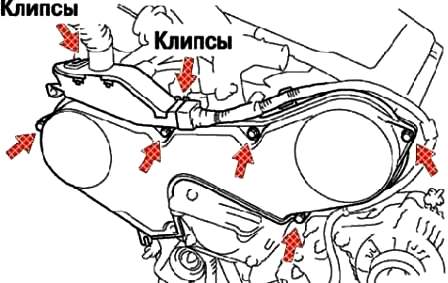
Remove the #2 timing belt cover.
Remove the bolt and remove the wiring protection from the #3 timing belt cover.
Remove the wire protection clip from the #3 timing belt cover.
Unscrew the 5 bolts, release the two fastening clips and remove the timing belt cover No. 2 (Fig. 2).
Remove the two bolts and nut and remove the right engine mount.
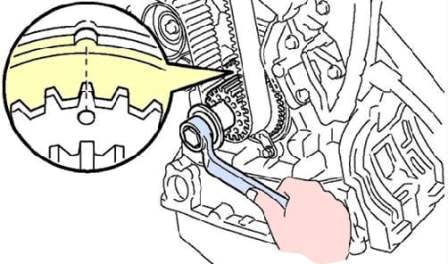
Set the piston of the 1st cylinder to TDC of the compression stroke.
Temporarily install the crankshaft pulley bolt onto the crankshaft.
Rotate the crankshaft by aligning the alignment marks on the crankshaft sprocket and the oil pump housing (fig. 3).
Always rotate the crankshaft clockwise.
Check if the marks on the camshaft pulleys match the marks on the #3 timing belt cover.
If not, rotate the crankshaft one revolution (360°).
Remove the crankshaft pulley bolt.
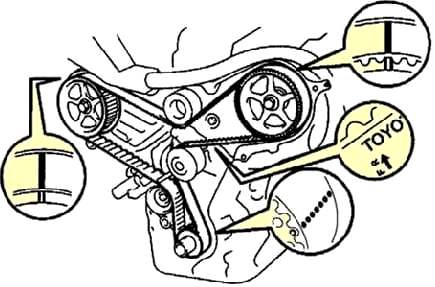
If the timing belt is to be reused, check that there are three alignment marks and a mark indicating the direction of rotation on the outside of the belt.
If there are no marks, apply three alignment marks opposite the marks on the toothed pulleys of the camshafts and crankshafts and a mark for the direction of rotation (Fig. 4).
Alternately loosening, unscrew the two bolts, remove the timing belt tensioner and boot.
Remove the timing belt.
Checking the timing belt
Do not bend or twist the timing belt.
Do not allow the toothed belt to come into contact with oil or water.
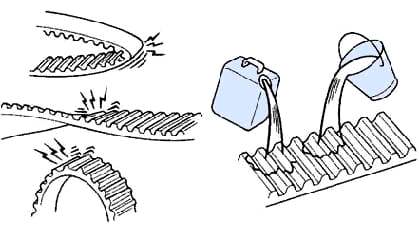
Do not stretch the timing belt when installing or removing the camshaft sprocket (Fig. 7)
Check the timing belt for defects.
Check that the timing belt is installed correctly.
Check the timing belt cover gaskets for damage and proper installation.
If the belt teeth are damaged or cracked, check if the camshaft is jammed.
If there is significant wear on the non-working (outer) side of the belt, check for nicks on the tensioner pulley, idler pulley and water pump drive pulley.
If wear or damage is found on only one end of the belt, check the belt guide and pulley alignment.
If the belt teeth are severely worn, check the toothed belt cover for damage, the gasket for correct installation and check for foreign matter on the belt teeth.
If necessary, replace the timing belt.
Carefully inspect and check the idler pulley and intermediate pulley.
Check for oil leaks from the tensioner pulley seal.
If the seal is damaged, replace the idler.
Check how smoothly the idler pulley and intermediate pulley rotate.
Replace the roller if necessary-tensioner and intermediate pulley:
Check the tensioner.
Check for oil leaks from the tensioner seal.
While holding the tensioner with both hands, push down firmly on the stem.
If the stem does not move, everything is fine. If the stem moves, replace the tensioner.
Do not point the tensioner rod down.
Measure how far the tensioner rod protrudes.
Nominal protrusion -70.0-10.8 mm
If the rod protrudes more or less, replace the tensioner.
Installing the timing belt
Set the piston of the 1st cylinder to TDC of the compression stroke.
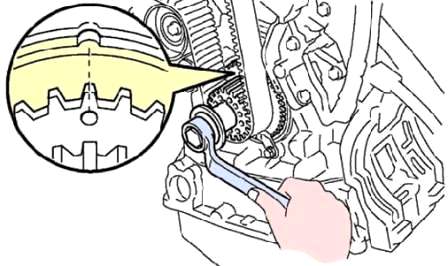
Temporarily install the crankshaft pulley bolt and rotate the crankshaft to align the timing marks on the crankshaft sprocket and oil pump housing (see fig. 5).
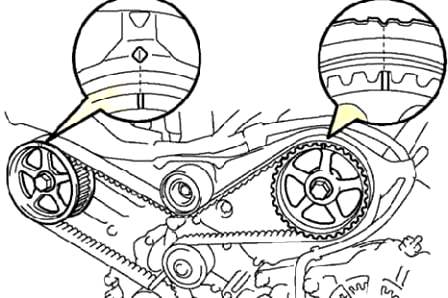
Using a special tool, rotate the camshafts, aligning the alignment marks on the toothed pulleys of the shafts and the cover No. 3 of the timing belt (see Fig. 6).
Install the timing belt.
Remove, if present, any liquid from the toothed pulleys and rollers.
When installing a reusable belt, make sure the arrow points in the direction the belt rotates.
Align the timing marks on the belt and crankshaft pulley.
Align the timing marks on the belt and camshaft pulleys.
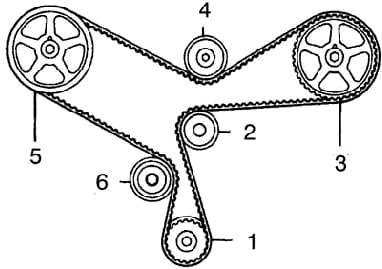
Install the timing belt, putting it on the elements in the indicated sequence, as shown in Figure 7:
- 1 - crankshaft toothed pulley;
- 2 - coolant pump pulley;
- 3 - front camshaft pulley;
- 4 - intermediate pulley;
- 5 - rear camshaft pulley;
- 6 - tensioner roller.
Install the timing belt tensioner.
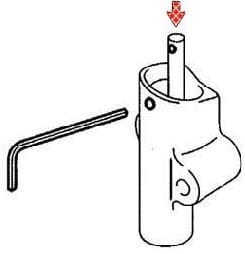
Move the tensioner rod so as to align the holes on the rod and the tensioner body (force 980–9800 N).
Lock the stem with a 1.27mm hex wrench.
Install the boot on the tensioner. Alternately tighten the two bolts securing the tensioner to a tightening torque of 27 Nm.
Remove the hex key that secures the stem (fig. 8).
Check the valve timing.
Turn the crankshaft one turn until the alignment marks on the crankshaft sprocket and the oil pump housing are aligned (see Fig. 3).
Check if the timing marks on the camshaft pulleys and timing belt cover No. 3 are aligned.
If this does not happen, reinstall the belt (see fig. 8).
Remove the crankshaft pulley bolt.
Install the right engine mount, securing it with a tightening torque of 28 Nm.
Install timing belt cover #2.
Check for cracked or delaminated belt cover gasket. Replace the gasket if necessary.
Install timing belt cover #2 and tighten five bolts to 8 Nm.
Install the wiring guard on the #3 timing belt cover.
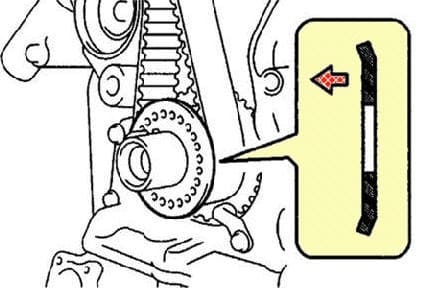
Install the timing belt guide with the protrusion outward (fig. 9).
Install timing belt cover #1 and tighten the four bolts to torque 8 Nm.
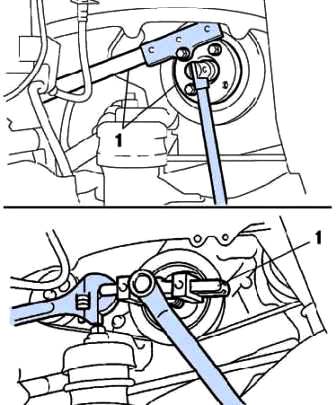
Install the crankshaft pulley by aligning the key on the crankshaft with the keyway on the pulley, install the pulley and using the special tool
Tighten the pulley bolt to 216 Nm (see fig. 10).
Install the #2 alternator bracket and install the hinge bolt and nut without tightening them.


