")
")
")
")
")
")
You will need: a hex wrench “6”, heads “12”, “13”, “14”, a small chisel, a hammer
Drain the cooling system

Remove the radiator of the cooling system.
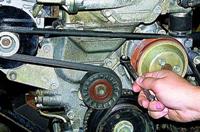
Remove the power steering pump drive belt and fan pulley.
Remove the alternator and water pump drive belt.

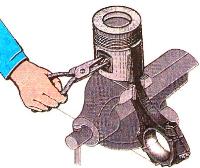
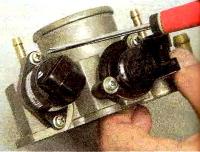
Loosen the inlet hose clamp (fig. 2) and remove the hose.

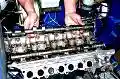
Remove the cylinder head cover.

Unscrew the four bolts (Fig. 4) and remove the front cover of the cylinder head assembly with the fan drive clutch and fan (the viscous clutch with the fan is removed for clarity).

Remove the water pump.

Remove the crankshaft speed sensor (timing sensor) (fig. 6).
Remove the crankshaft pulley.
Remove the oil pan.

Remove the two bolts (Fig. 7) and remove the upper chain tensioner cover with gasket.
Remove the cover carefully, as the hydraulic tensioner spring acts on it.
Then remove the hydraulic tensioner.

Remove the lower chain tensioner in the same way (Fig. 8).
Remove the seven bolts and remove the chain cover.
Remove the cover carefully so as not to damage the front crankshaft oil seal installed in it, the cover gaskets and the cylinder head gasket.
Remove the top tensioner bolt and remove the sprocket tensioner arm.
Remove the lower sprocket tensioner arm in the same way.

Remove the two bolts (Fig. 9) and remove the plastic chain guide.

Remove the gears from the camshafts by unscrewing the bolts securing the gears to the camshaft flanges (Fig. 10).

Remove the bolts2 (Fig. 11) and pull up the chain guide 1.
Unbend the ends of the locking plate 6 and unscrew the bolt 5, to do this, keep the intermediate shaft from turning by inserting a screwdriver into the hole of the gear 3.
Remove gear 4 by inserting a screwdriver between it and gear 3 and pushing the screwdriver against gear 3 like a lever.
Remove gear 4 from the top chain and remove the chain by pulling it up.
Remove gear 3 from the intermediate shaft and remove it from the lower chain.
Remove the lower chain from the crankshaft gear.

If it is necessary to remove gear 2 from the crankshaft, first remove bushing 1 (fig. 12) and the rubber sealing ring between bushing and gear.
Then press gear 2 with a puller.
After removing, wash the chains and gears in gasoline, wipe and dry them.
Inspect the chains.
If cracks, chips, or significant signs of wear are found on the chain bushings, replace the chains.
Replace gears that have chipped or chipped teeth.
Replace damaged chain guides.
The tensioner sprockets must rotate freely on the axles. If the sprocket teeth are chipped or chipped, replace the tensioners.
If the gear was removed from the crankshaft, press it onto the crankshaft, install the O-ring and bushing.

Turn the crankshaft so that mark 1 (fig. 13) on the crankshaft gear matches mark 2 on the cylinder block.
In this case, the piston of the 1st cylinder will take the TDC position.
Install the chain damper 4 without tightening the bolts 3 fastening the damper.
Put chain 5 on the crankshaft gear after lubricating it with engine oil.

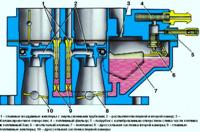
Put the chain on the driven gear 1 (fig. 14) and install the gear on the countershaft 2 so that the pinion of the gear enters the hole in the countershaft.
In this case, mark 4 on the gear must coincide with mark 5 on the cylinder block, and the chain branch passing through the damper 3 must be tensioned.
Install the countershaft drive gear so that its locating pin fits into the hole in the driven gear.
Install the two countershaft gear bolts with a lock plate underneath them.
Tighten the bolts to 22–25 N m (2.2–2.5 kgf m) and secure them by bending the edges of the lock plate on the edges of the bolt heads

Pushing the tensioner lever (fig. 15), tighten the chain and check the alignment of the marks on the gears and the cylinder block.
Tighten the chain guide bolts.
Lubricate the top chain with engine oil and then slide it over the countershaft drive gear through the hole in the cylinder head.

Place the chain on gear 2 and turn the exhaust camshaft slightly clockwise to install gear 2 with the chain on it.
Camshaft pin 8 must fit into the gear hole.
Insert bolt 1. Turn the camshaft with a wrench on the square on the camshaft.
Then, turning the camshaft slightly counterclockwise, tension the chain.
The intermediate and crankshafts must not rotate while doing this.
Mark "A" must align with the top surface of the cylinder head.
Remove bolt 6 and remove gear 4 from the intake camshaft.
Put a chain on gear 4 and install gear 4 with chain on
camshaft by slightly turning the camshaft clockwise.
Camshaft pin 5 must fit into the gear hole.
Slightly turn the camshaft counterclockwise to tension the chain.
The "A" mark on gear 4 must align with the top surface of the cylinder head.
The rest of the shafts must not rotate.
Install bolt 6. Tighten bolts 1 and 6 to 46–74 Nm (4.6–7.4 kgf m), holding the camshafts from turning with a wrench by the squares.
Install damper 3 by pushing it into the hole in the block head.
Install damper 7.
Install the chain cover and water pump. Apply a thin layer of sealant to the surfaces of the covers adjacent to the cylinder block and block head.
When installing the chain cover, be careful not to damage the crankshaft oil seal.
Install the upper and lower chain tensioners.
Install the crankshaft pulley.
Install the bolt securing the crankshaft pulley, then, engaging fifth gear and braking the car with the parking brake, tighten the bolt to 104–128 Nm (10.4–12.8 kgf m), while holding the crankshaft from turning.
When the ratchet is tightened, the pulley is pressed onto the crankshaft.
Turn the crankshaft two turns by the ratchet and set the piston of the 1st cylinder to the TDC position (see operation 3).
Check if the labels match.
Install the front cover of the cylinder head, first apply a layer of sealant to the surface of the cover adjacent to the block head.
Tighten the cover bolts to 12–18 Nm (1.2–1.8 kgfm).
Install the cylinder head cover. Tighten the cover bolts to 6.0–12 Nm (0.6–1.2 kgf m).
Connect the crankcase ventilation hose and tube to the fittings on the valve cover, and the wires to the ignition coils.
Put the ends of the high-voltage wires on the spark plugs.
Install the previously removed attachments.