Checking the operation of the vacuum booster
Release the existing vacuum with the engine off by depressing the brake pedal several times at 5-second intervals
Fully depressing the brake pedal, start the engine.
Make sure the gap between the brake pedal and the floor panel decreases as the vacuum in the engine stabilizes.
Leak test
Start the engine and let it idle for about 1 minute.
Shut it down by applying vacuum to the booster.
Depress the brake pedal several times with normal force and release the existing vacuum.
Ensure that as you press the brake pedal, the gap between the brake pedal and the floor panel gradually increases.
Start the engine.
Depress and hold the brake pedal, then stop the engine.
Keep the pedal depressed for about 30 seconds or more and check that the pedal travel does not change.
If this did not happen, check:

Check the fit of the hose fitting in the hole of the vacuum brake booster

Checking the fit of the hose on the receiver fitting

To check the non-return valve, remove the air supply sleeve

A non-return valve is installed in the vacuum hose fitting

Disconnect the vacuum hose fitting from the brake booster

Press the lock of the vacuum hose tip
You will need a rubber bulb to test it

Remove the hose from the receiver fitting

We firmly insert the bulb into the vacuum hose fitting and squeeze the bulb.
Air must flow freely through the non-return valve

Release the compressed pear. If the pear cracked, the check valve is faulty
Replacing the vacuum brake booster
Disconnect the negative battery terminal
Loosen the clamps and remove the air supply sleeve

We pry off the soundproofing fastener and move part of the soundproofing down

We unscrew the two nuts securing the master cylinder and move the master brake cylinder to the side without disconnecting the brake pipelines (the tubes are disconnected in the photo)

Disconnect the vacuum hose fitting from the vacuum booster

Remove the stopper and press the finger out of the hole of the pusher fork of the vacuum booster and the brake pedal

Remove the retainer for attaching the bracket to the vacuum booster

Turn the vacuum booster a quarter of a turn to either side

This is what the vacuum booster mount looks like

We remove the vacuum booster from the bracket hole

We unscrew the four nuts securing the bracket to the body

Remove the bracket

When replacing the vacuum booster, the O-ring of the brake master cylinder must be replaced
Installation
Installation is performed in the reverse order of removal.

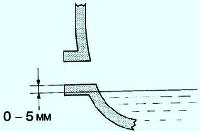
Before installing, measure the length of the fork stem (fig. 9):
- - for left-hand drive vehicles: X1 = 163.7 mm;
- - for right-hand drive vehicles: X1 = 133.2 mm.
If the length is not as specified, replace the amplifier.
Check the presence and blocking of the connecting shaft between the brake booster tappet and the brake pedal.
Install the vacuum brake booster without attaching the tappet to it.
Tighten the two brake booster mounting bolts to 21 Nm.
Install the brake master cylinder onto the brake booster.
Tighten the two nuts securing the brake master cylinder to 50 Nm.
")
")
")
")
")
")