The vehicles use a hydraulically actuated service brake system.
Service brake system with hydraulic drive, and parking system with cable
The working brake system is dual-circuit, diagonal.
One circuit provides braking for the right front and left rear wheels.
The second circuit provides braking for the left front and right rear wheels.
If one circuit fails, the second circuit provides vehicle braking.
The hydraulic brake drive consists of a master brake cylinder with a vacuum booster, working cylinders of the brake mechanisms of the front and rear wheels and an ABS system.
All units are interconnected using hoses and tubes.
Parking brake system - with cable drive to the rear wheel brakes.
The system works as follows:
- – the brake pedal is connected to the master brake cylinder;

- - when the pedal is pressed, fluid under pressure from the brake master cylinder is transferred through metal tubes and flexible hoses to the front and rear brake mechanisms;
- - working brake cylinders are hydraulic modulators that convert the fluid pressure created in the main brake cylinder into movement of the elements of the brake mechanism;
- - the front and rear pistons of the brake caliper move and, due to friction on the brake discs and drums, provide the required deceleration of the car;
- – when the brake pedal is released, the pressure in the system decreases.
Brake pads and pistons return to their neutral or rest position and braking stops.
When the brake fluid level decreases, the fluid level sensor in the master brake cylinder turns on the warning lamp in the instrument cluster.
If the warning lamp is on, first check that the parking brake is released, as the lamp indicates a low fluid level and a applied parking brake.
Brake booster
The car is equipped with booster brakes, which are automatically adjusted during the operation of the car.
If for any reason, such as an engine failure, the brake booster fails completely, the vehicle can be brought to a halt by depressing the brake pedal harder than usual.
The braking distance will increase.
If the engine is not running, then gradually, each time you press the brake pedal, the energy reserve of the brake booster is lost. Therefore, if the booster is interrupted, do not apply the brake pedal again unless necessary to maintain control on a slippery surface.
Brake pedal - suspension type.

A brake pedal position sensor is installed in the pedal assembly bracket, combined with a brake light switch - its contacts close when the brake pedal is pressed.
The sensor sends a signal to the ECU that the brake pedal is depressed.
The vacuum brake booster is designed to reduce the force that must be applied to the brake pedal when braking the car, by using the vacuum in the intake piping of a running engine.
The booster is located between the brake pedal and the brake master cylinder and is attached with four nuts to the pedal assembly bracket. The vacuum booster is non-separable, in case of failure it is replaced with a new one.
The main brake cylinder is attached to the vacuum booster housing with two nuts.

At the top of the cylinder, there is a common reservoir for the hydraulic drive of the brake system and clutch, in which there is a supply of fluid. The tank body is marked with maximum and minimum liquid levels. A liquid level sensor is installed in the tank, which, when the liquid level drops below the MIN mark, turns on a signaling device in the instrument cluster.
When the brake pedal is pressed, the pistons of the master cylinder move, creating pressure in the hydraulic drive, which is supplied through pipes and hoses to the working cylinders of the wheel brake mechanisms.
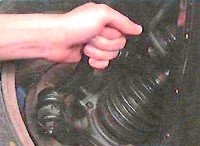
Front wheel brake - disc, with a floating caliper, including a single-piston wheel cylinder. For more efficient cooling the brain disc is ventilated.

The brake mechanisms of the left and right front wheels are not interchangeable.
The brake pad guide is attached to the steering knuckle, and the caliper is attached with two bolts to the guide pins installed in the holes of the pad guide.
Protective covers are installed on the fingers.

When braking, the fluid pressure in the hydraulic drive of the brake mechanism increases and the piston, moving out of the wheel cylinder, made in one piece with the caliper, presses the inner brake pad against the disc.
Then the caliper (due to the movement of the guide pins in the holes of the guide pads) moves relative to the disc, pressing the outer brake pad against it.
A piston with a sealing rubber ring is installed in the cylinder body. Due to the elasticity of this ring, a constant optimal clearance is maintained between the disc and the brake pads (similarly, the optimal clearance is maintained in the rear disc brake mechanism).
Depending on the configuration, two types of rear wheel brakes can be installed on cars: disc or drum.
Rear wheel disc brake - with a floating caliper, including a single-piston slave cylinder.

The design of the rear brake cylinder is very complex, because combines a conventional hydraulic cylinder (similar in design to the front brake cylinder) and a parking brake mechanism.
The parking brake actuator works as follows. The parking brake cable acts on the drive lever and turns it. The spring returns the drive lever to its original position.
In this way, the movement of the lever will be transmitted to the threaded rod, which interacts with the threaded pin installed in the piston.

The threaded pin can be rotated in the piston.
Moreover, when the finger is pressed against the inner surface of the piston, turning is very difficult, and if the finger moves away from the piston, it turns easily on the thrust bearing.
The threaded pin in the piston is pressed (through the thrust bearing) by the spring.
Thus, as the brake pads wear, the threaded pin unscrews further from the threaded rod, allowing the piston to move out of the cylinder and at the same time maintain a constant parking brake stroke.
This design of the rear brake cylinder determines the way the piston is recessed into the cylinder when replacing the pads. The piston cannot simply be pushed into the cylinder.
Using too much force will damage the parts.
The piston must be screwed in clockwise and at the same time strongly pressed on it to ensure proper friction and screwing the threaded pin into the threaded rod of the parking brake actuator.
The shoe guide is attached to the rear suspension arm. The disc brake pads of the front and rear wheels differ in design.
Drum brake - with a two-piston wheel cylinder, two brake shoes with automatic adjustment of the gap between the shoes and the drum.

The automatic adjustment mechanism starts to work when the gap between the shoes and the brake drum increases.
When you press the brake pedal, the pads begin to diverge and press against the brake drum, while the protrusion of the adjusting lever moves along the cavity between the teeth of the ratchet.
At a certain amount of pad wear and the brake pedal is depressed, the adjustment lever has enough travel to turn the ratchet one tooth, thereby increasing the length of the spacer bar and at the same time reducing the gap between the pads and the drum.

In this way, the gradual lengthening of the spacer bar automatically maintains the clearance between the brake drum and the shoes.
The wheel cylinders of the brake mechanisms of the rear wheels are the same.
The front brake pads are the same, but the rear ones are different (they have mirrors Non-removable parking brake levers are installed flax-symmetrically).
The spacer bar and brake ratchet of the left wheel are silver (left-hand thread is made on the ratchet pin and spacer bar hole), and the right wheel is golden (right-hand thread is made on the ratchet pin and spacer bar hole).
The cylindrical ends of the ratchets are fitted with spacer bar tips, the same for the brake mechanisms of the left and right wheels.
The brake levers of the left and right wheels are mirror-symmetrical.
The parking brake lever, fixed between the front seats on the floor tunnel, is connected to two cables via the front cable and equalizer.

The rear ends of the cables are connected to the parking brake levers mounted on the rear brake calipers (disc mechanism) or on the rear brake shoes (drum mechanism).
The parking brake is adjusted by turning the adjusting nut located on the tip of the front cable.
Anti-Lock Braking System (ABS)
An anti-lock braking system is installed to prevent the wheels from locking up during heavy braking or braking on slippery surfaces.

Compared to a conventional braking system, the anti-lock braking system provides better control when braking in such situations.
The anti-lock braking system (ABS) cannot compensate for bad road conditions, unruly and dangerous driving, or misjudgment.
Anti-Lock Braking System (ABS) is designed to achieve maximum braking performance on normal highways and roads in good condition.
On poor road surfaces, ABS can even reduce braking performance.
Always drive at a reasonable speed for weather and road conditions.
Under normal driving conditions, the anti-lock braking system behaves exactly like a conventional braking system. ABS is activated when the wheels lose traction.
The brake pedal will then pulsate and you can hear or feel its vibrations. This is normal and indicates the correct operation of the system.
When driving a vehicle equipped with an anti-lock braking system, adjust your driving style to the road and traffic situation and remember the following:
- - do not repeatedly press the brake pedal, as when braking with a conventional brake system.
For ABS to work properly, depress the brake pedal hard without using intermittent braking;
- - even a car equipped with ABS needs a fairly long braking distance. Therefore, always keep a sufficient distance behind vehicles moving in front;
- - Always slow down before turning. The anti-lock braking system is unable to prevent accidents caused by driving at too high a speed;
- - on undulating and uneven roads, ABS can increase the braking distance compared to a conventional braking system;
- - Avoid driving at high speeds on wet roads. ABS cannot eliminate the risk of hydroplaning.
If a failure of the anti-lock braking system occurs, the brakes will continue to work as in a conventional brake system.
If the ABS warning light comes on and stays on, the vehicle's ABS has failed. However, the brakes will still work normally.
When starting the engine, the ABS warning light will come on for 4-5 seconds.
At this time, the ABS will undergo a diagnostic test. If everything is in order, the control lamp will go out. If the lamp stays on, it means that there is a malfunction in the ABS system.
If the vehicle's battery is dead and the engine is started using another vehicle's battery, the ABS warning light may come on.
This will be due to a dead battery, not a broken ABS.
Charge the battery before driving.
If the main brakes fail while driving, you can use the parking brake for emergency braking. The braking distance will be much longer.
Parking brake
Pushing the parking brake lever up while the vehicle is moving at normal speeds can cause an unexpected loss of vehicle control.
If necessary imo use the parking brake to stop the car, do it with great care.
When driving on long or steep downhills, shift to a lower gear to avoid constant braking.
Continuous braking causes the brakes to overheat and reduce braking efficiency.
Wet brakes can impair vehicle deceleration and cause the car to turn to one side or the other when braking.
You can tell if the brakes are wet by depressing the brake pedal lightly.
Always control your brakes this way after driving through deep puddles and other water obstacles.
Dry the brakes on a straight, safe section of the road, maintaining a safe speed and lightly depressing the brake pedal until the braking performance reaches a normal level.
Disc brake lining wear indicator
The car is equipped with disc brakes on the front wheels.

If the brake pads are worn to the limit, they must be replaced. Then the front brakes make a continuous or intermittent "squeaking" sound.
Brake pad wear is signaled by a high-pitched tone, indicating that the vehicle needs a service check.
If you ignore the audible warning, this can lead to reduced braking efficiency and create dangerous situations.
In some road or climate conditions, the brakes may produce a high-pitched screeching sound upon first or light braking. This is normal and does not mean a brake problem.
Rear drum brakes
The car's rear drum brakes do not have a brake pad wear indicator.

If the rear brakes make a "squeaky" sound, check the condition of the brake pads.
Check also the rear brakes every time you change or swap tires and when you change the front brake pads or full front brakes.
Change the brake pads or brake linings always in pairs for the front and rear axles.
Possible brake failures and solutions
Failure cause - Remedy
Squealing, screeching when braking
Brake pad wear limit - Replace the brake pads (preferably all on the same axle at the same time)
The introduction of foreign particles (sand) into the lining material - As a rule, it does not require intervention (the lining can be cleaned with a wire brush)
Poor quality lining material - Replace the pad (preferably all on the same axle at the same time)
Severely corroded brake disc (due to poor quality disc and/or lining material) - Grind (turn) or replace disc
The lining of the brake pad has peeled off from the base - Replace the pad (preferably all on the same axle at the same time)
Weak or broken rear brake shoe return spring - Replace spring
Increased brake pedal travel (pedal soft or falling through)
Air in the brake system, leakage of brake fluid through leaks in the hydraulic drive connections, damage to the cuffs in the main brake cylinder, pressure regulator, damage to the brake pipes and hoses - Inspect all lines, their threaded connections and cylinders, eliminate leaks.
Restore the normal fluid level in the brake reservoir and bleed the system.
If damage to the brake hoses is found (cracks, swelling or traces of brake fluid), replace the hoses. If you suspect defects in the master brake cylinder, replace it with a known good one
The rubber cuffs of the cylinders are swollen due to the ingress of oil, gasoline, etc. into the brake fluid. - Replace cylinders, hoses, completely drain the brake fluid, flush the system with fresh fluid and pump
Brake overheating - Let the brakes cool down. Check the thickness of the pads and brake discs.
Use only brake fluid recommended by the manufacturer in the system. Replace your brake fluid on time
The gap between the pads and the drum has been increased (the automatic gap adjustment device does not work)
Replace the wheel cylinder, bleed the system
Increased (more than 0.25 mm at the edge) runout of the brake disc - Replace the disc
One of the circuits of the working brake system does not work - Eliminate the leakage of fluid from the brake system, bleed the system
The brake pedal travel is within the normal range (the pedal is “hard”), but the car brakes badly
Oiling brake discs, drums, linings - Clean the oiled discs and drums, replace the pads (in the extreme case, grind on emery). It is strictly forbidden to clean the pads with solvents! Eliminate the cause of oiling (replace the axle shaft seal)
An ice or salt crust has formed on the surface of the overlays (in winter); pads are wet - At the beginning of the movement, at low speed, check the brakes. In the rain and after driving through deep puddles, dry the brakes by lightly pressing the pedal
Poor quality lining material - Replace the pads (preferably all on the same axle at the same time)
Clogged brake lines: pipes (due to dents) or hoses (due to swelling or delamination of rubber) - Replace damaged pipes and hoses
Jamming of the piston in the cylinder, pads in the caliper - Replace the cylinder, clean the contact surfaces of the pads and caliper, lubricate them with SHRUS-4 before installation
Complete wear of the brake pads (grinding of the brakes) - Replace the brake pads (preferably all on the same axle at the same time)
The lining of the brake pad has peeled off from the base - Replace the pad (preferably all on the same axle at the same time)
Incorrectly adjusted pressure regulator actuator - Adjust actuator
Faulty pressure regulator - Replace regulator
The vacuum booster is defective or the hose connecting the booster to the inlet pipeline is leaky - Check the integrity of the hose, its fit on the fittings, tightening of the clamps.
To check the amplifier, turn off the engine, press the brake pedal 5-8 times and, keeping the pedal depressed, start the engine.
With a working booster, after starting the engine, the pedal should noticeably "go" forward. Replace defective amplifier
Incomplete release of all wheels
The rubber cuffs of the cylinders are swollen due to the ingress of oil, gasoline, etc. into the brake fluid. - Replace cylinders, hoses, completely drain the brake fluid, flush the system with fresh fluid and pump
Jamming of the piston of the main cylinder (due to corrosion, breakage of return springs, ingress of mechanical impurities into the liquid) - Replace the main cylinder, bleed the system
Brake pedal sticking: the return spring is broken or extended, the pedal bushings are worn out, the pedal bushings are not lubricated, the axle is corroded - Replace the defective spring, bushings, put fresh Litol-24 grease in them
Braking one of the wheels with the brake pedal released
Jammed wheel cylinder piston - Replace cylinder
The rubber cuffs of the cylinders are swollen due to the ingress of oil, gasoline, etc. into the brake fluid. - Replace cylinders, hoses, completely drain the brake fluid, flush the system with fresh fluid and pump
Clogged brake lines: pipes (due to dents) or hoses (due to swelling or delamination of rubber) - Replace damaged pipes and hoses
Rear brake pad peeling off - Replace the pad (preferably all on the same axle at the same time)
Weak or broken rear brake shoe return spring - Replace spring
Deformation of the spacer bar, misalignment of the pads due to deformation of the brake plates - Straighten or replace the spacer bar, brake plates
The parking brake is pulled, the cables are wedged in the sheaths - Adjust the tension of the cables, lubricate them with engine oil, if the sheath is damaged or the wires of the cable are frayed, and also if they are severely corroded, replace them
Bad parking brake
Incorrect drive adjustment - Adjust drive
Drive cables jammed in sheaths - Lubricate the cables with engine oil if the sheath is damaged or the wires of the cable are frayed, and also if they are severely corroded - replace them
Brake drums, linings are oiled - Clean the oiled drums, replace the pads (in extreme cases, grind on emery).
It is strictly forbidden to clean the pads with solvents! Eliminate the cause of oiling (replace the axle shaft seal)
An ice or salt crust has formed on the surface of the overlays (in winter); pads are wet - At the beginning of the movement, at low speed, check the brakes.
In the rain and after driving through deep puddles, dry the brakes by lightly depressing the brake pedal
Complete wear of the brake pads (grinding of the brakes) - Replace the brake pads (preferably all on the same axle at the same time)
When the parking brake lever is released, the wheels are not released
After a long parking of the car, the pads stuck (or froze) to the drum - While pulling the parking brake lever or cables, try to carefully (so as not to rip off the brake linings) turn the wheel.
Check the ease of movement of the cables in the shells, the pistons in the wheel cylinders, the rigidity of the return springs of the cables and the return springs of the shoes.
When parking the car, if possible, do not apply the brake, but shift into gear
Incorrect drive adjustment - Adjust drive
Drive cables jammed in sheaths - Lubricate cables with engine oil if sheath is damaged or cable wires are frayed wasp, as well as in case of severe corrosion - replace them
Moving the car away from a straight line (on a flat road)
Various tire pressure - Set normal pressure
Violation of the angles of the longitudinal inclination of the axis of rotation or camber of the front wheels - Adjust the angles of inclination of the axis of rotation or camber of the front wheels
Significant difference in tire wear - Replace worn tire
Uneven settlement or broken suspension springs - Replace both springs
Deformed parts of the suspension and / or body of the car - Straighten or replace the deformed parts and body panels
Displacement of the rear axle due to breakage of the rods or their mounting brackets - Replace the rods, weld the brackets
Wheel braking due to wheel cylinder piston seizure - Replace cylinder
Rear wheel drag due to loose or broken rear brake shoe return spring - Replace spring
Clogged brake lines: pipes (due to dents) or hoses (due to swelling or delamination of rubber) - Replace damaged pipes and hoses
Steering or skidding the car when braking
Jammed wheel cylinder piston - Replace cylinder
Clogged brake lines: pipes (due to dents) or hoses (due to swelling or delamination of rubber) - Replace damaged pipes and hoses
Wheel jamming due to delamination of the lining from the base of the brake pad - Replace the pad (preferably all on the same axle at the same time)
Oiling brake discs, drums, linings - Clean the oiled discs and drums, replace the pads (in extreme cases, grind off with sandpaper).
It is strictly forbidden to clean the pads with solvents! Eliminate the cause of oiling (replace the axle shaft seal)
An ice or salt crust has formed on the surface of the overlays (in winter); pads are wet - At the beginning of the movement, at low speed, check the brakes.
In the rain and after driving through deep puddles, dry the brakes by lightly depressing the brake pedal
Different pressure in the tires of the left and right wheels - Set the normal pressure
Significant difference in tire wear - Replace worn tire
Distortion of the brake disc - Replace the disc (preferably in pairs)
Brake drum out-of-round - Turn or replace drum
")
")
")
")
")
")