Removing the cylinder head
Drain the coolant from the cooling system and disconnect the upper radiator hose
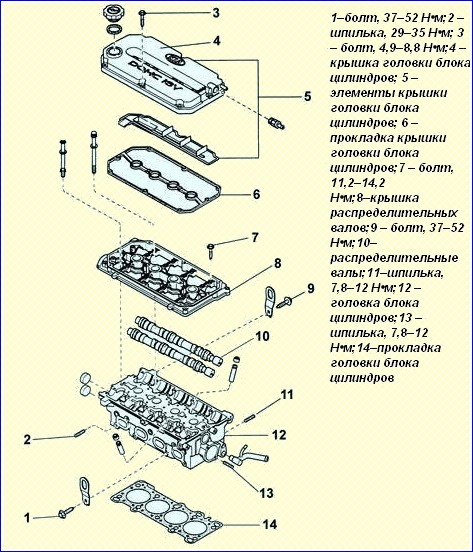
DOHC engine cylinder head (A5D)
Remove the wide hose located between the air filter and the main cover.
Remove the air intake duct.
Remove the vacuum hose, fuel hose and coolant hose.
Remove the high voltage wires from the spark plugs. Remove high-voltage wires by the spark plug tips, and not by the wires themselves.
Remove the ignition coil.
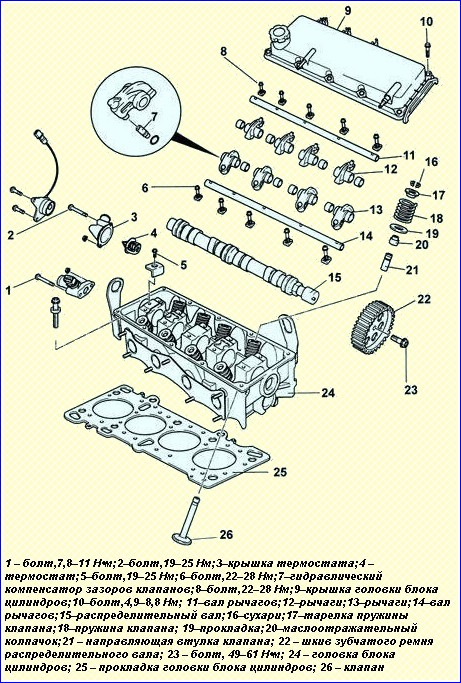
SOHC Engine Cylinder Head (A3E)
Remove the power steering oil pump and bracket.
Remove the intake manifold.
Remove the heat shield and exhaust manifold assembly.
Remove the water pump pulley and crankshaft pulley.
Remove the toothed belt guard.
Remove the timing belt tensioner pulley.
Remove the timing belt.
Remove the cylinder head cover and camshaft cover.
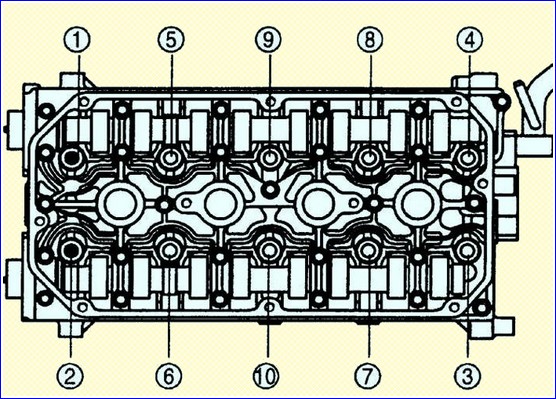
In a certain sequence, in 2-3 stages, remove the cylinder head bolts.
Remove the cylinder head and cylinder head gasket.
Clean the mating surfaces of the cylinder head and cylinder block of gasket residue.
Make sure no gasket residue gets into the lubrication channels and engine cylinders.
Check the cylinder head gasket for leaks, coolant stains, or burnt gasket between cylinders.
Checking the cylinder head
Inspect the cylinder head for damage, cracks, oil and coolant leaks. If necessary, replace the cylinder head.
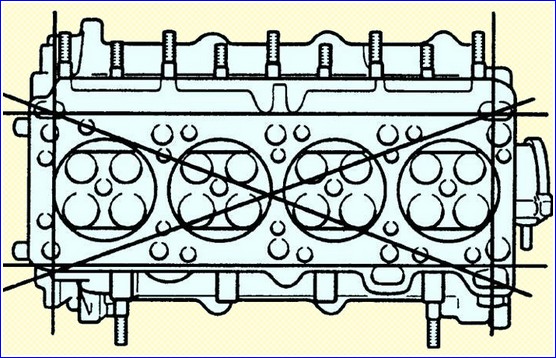
Use a metal ruler and feeler gauge in six directions to check the flatness of the cylinder head.
Regrind the cylinder head if necessary.
Maximum deviation from flatness:
- A5D motor: 0.03mm
- A3E motor: 0.05mm
Before installing the cylinder head, check the following items and repair or replace the head if necessary:
- – state and installation depth of valve seats;
- - damage to the mating surfaces of the intake and exhaust manifolds;
- - clearances in bearings and axial play of camshafts.
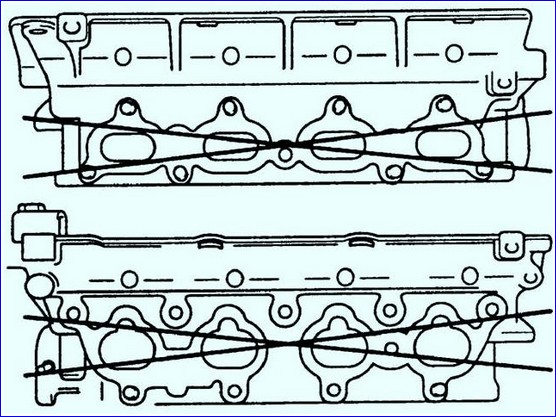
Using a metal ruler and a feeler gauge in two directions, measure the flatness of the mating surfaces of the collectors.
Maximum deviation from flatness:
- A5D motor: 0.03mm
- A3E motor: 0.05mm
Measure the height of the cylinder head from the base of the cylinder head to the installation surface of the cylinder head cover gasket.
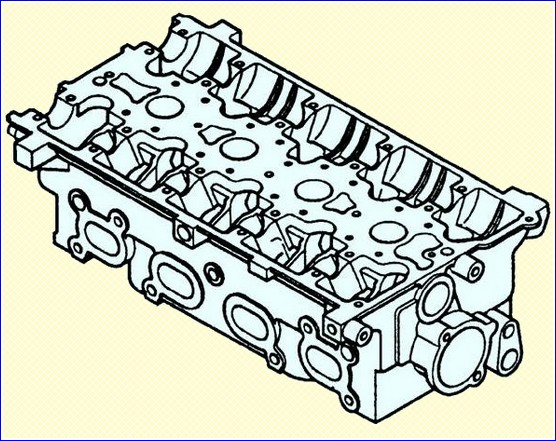
Height:
- A5D engine: 127.8-128.0mm
- A3E engine: 107.4-107.6mm
If the cylinder head height is out of specification, replace the cylinder head.
If it is necessary to machine the cylinder head, first remove the intake and exhaust manifolds and check the flatness of the mating surfaces of the manifolds.
Using a metal ruler and a feeler gauge in two directions, measure the flatness of the mating collector surfaces. Flatness deviation: no more than 0.05 mm
If the flatness is out of tolerance, replace the cylinder head.
Installing the cylinder head of the A5D engine
Clean the mating surfaces of the cylinder head from gasket residue.
Install a new gasket on the engine block. When installing the gasket, use sealant.
Do not reuse the cylinder head gasket. Install the cylinder head.
In a certain sequence, tighten the cylinder head bolts in several stages:
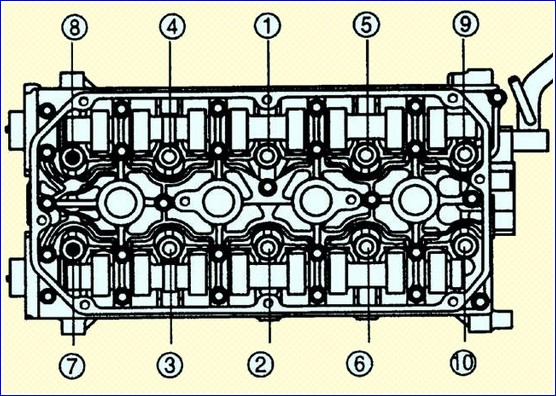
- a. tighten the bolts with a tightening torque of 49 Nm;
- b. loosen the cylinder head bolts in reverse order to tightening;
- c. re-tighten the bolts with a tightening torque of 25 Nm;
- d. tighten the bolts by 90°.
Do not rotate the engine crankshaft with the toothed belt removed.
Before installing, make sure the pistons are between TDC and BDC. This will prevent the pistons and valves from colliding, which can lead to deformation of the valves and damage to the engine.
Two bolts (7 and 8) are shorter than the other bolts. Do not install these bolts in other positions.
New bolts must be used to mount the cylinder head.
Install the timing belt tensioner pulley.
Install the toothed belt onto the camshaft pulley, making sure that all installation grids are aligned with the pointers.
Check the alignment of the alignment marks of all the toothed belt pulleys.
Install the cylinder head cover and secure it with the bolts to the correct torque. Tightening torque: 4.9 - 8.8 Nm
Install the toothed belt guard.
Install a new intake manifold gasket and intake manifold. Fix the intake manifold with bolts, tightening them to the required torque.
Install a new exhaust manifold gasket and exhaust manifold. Secure the exhaust manifold with nuts, tightening them to the required torque.
Install the surge tank and tighten the bolts and nuts to the correct torque.
Tightening torque:
- Intake and exhaust manifold bolts and nuts: 15-20 Nm
- Surge reservoir to intake manifold nuts and bolts: 15-20 Nm
Install the power steering oil pump and bracket.
Install the ignition coil.
Install the air intake duct.
Connect the vacuum hose, fuel hose and coolant hose.
Install a wide hose between the air filter and the main cover.
Installing the cylinder head of the A3E engine
Clean the mating surfaces of the cylinder head from gasket residue.
Install a new gasket on the engine block. When installing the gasket, use sealant. Do not reuse the cylinder head gasket.
Install the cylinder head.
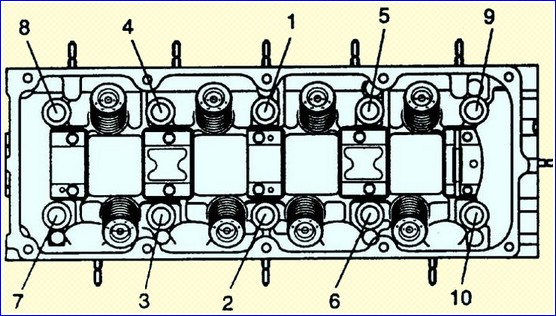
In a certain sequence, tighten the cylinder head bolts in several stages:
- a. tighten the bolts with a tightening torque of 49 Nm;
- b. loosen the cylinder head bolts in reverse order to tightening;
- c. re-tighten the bolts with a tightening torque of 25 Nm;
- d. tighten the bolts by 90°.


