Removing and installing the starter (models with 1-2AZ-FE engine)
Disconnect the wires from the battery terminals
Remove the battery with support.
Remove the air filter assembly with bracket.
Disconnect the starter connector.
Remove the nut and disconnect terminal 30 of the starter wiring.
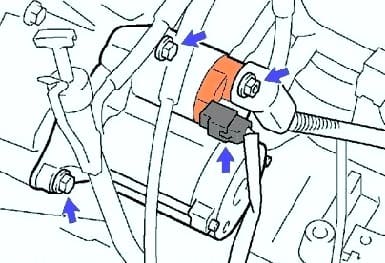
Remove the two mounting bolts and remove the starter (fig. 1).
Install the starter.
Tighten the fastening nut 30 of the output with a tightening torque of 30 Nm.
Tighten the two starter mounting bolts to 39 Nm.
Install the rest of the components in the reverse order of removal.
Removing and installing the starter (models with 1MZ-FE engine)
Disconnect the wires from the battery terminals.
Remove the battery with support.
Remove the air filter assembly with bracket.
Disconnect the starter connector.
Remove the nut and disconnect terminal 30 of the starter wiring.
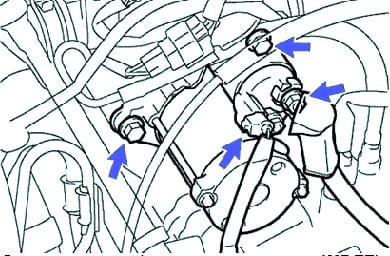
Remove the two mounting bolts and remove the starter (fig. 2).
Install the starter.
Tighten the fastening nut 30 of the output with a tightening torque of 9.8 Nm.
Tighten the two starter mounting bolts to 42 Nm.
Install the rest of the components in the reverse order of removal.
Checking the operation of the starter
Checking the starter relay
Checking should be carried out in the interval of 3-5 s to avoid damage to the stator winding.
Checking the solenoid winding of the traction relay
Disconnect the wire from the starter terminal "C".
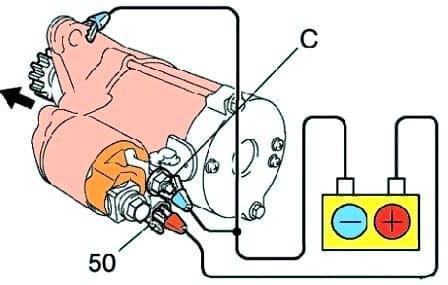
Connect the wires from the battery to the terminals of the traction relay, as shown in Figure 3.
Make sure the freewheel gear is out.
If the freewheel drive gear does not retract, replace the traction relay.
Checking the holding winding
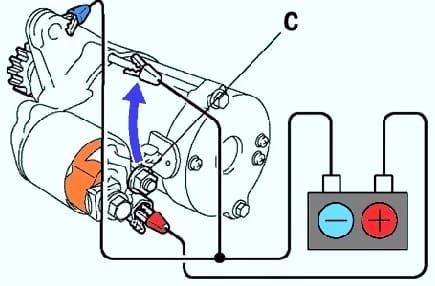
With the connections made in the order shown in the previous test and the freewheel drive gear extended, disconnect the negative wire from terminal "C" (fig. 4).
Make sure the pinion gear stays extended.
If the drive gear returns inside, then replace the traction relay.
Checking Freewheel Drive Gear Return
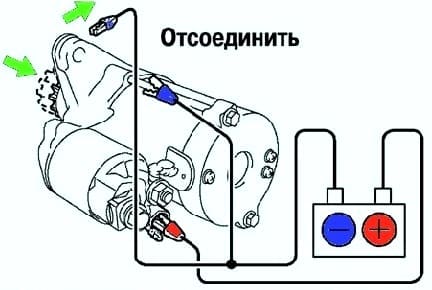
Disconnect the negative wire from the traction relay housing (fig. 5).
Make sure the freewheel drive gear is retracted inward.
If the freewheel drive gear has not retracted, replace the traction relay assembly.
Checking the operation of the starter without load
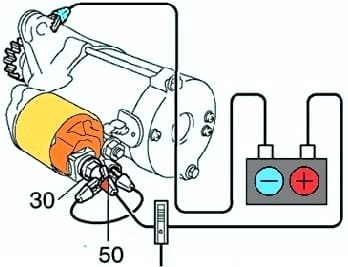
Connect the wires from the battery and from the ammeter to the starter as shown in Figure 6.
Check that the starter armature rotates evenly and the freewheel drive gear is extended.
Measure the current with an ammeter.
Rated current at 11.5 V: 90 A.
Checking the starter relay
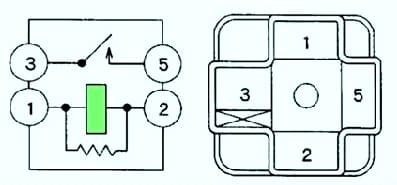
Using an ohmmeter, check for continuity between terminals "1" and "2" (Fig. 7).
Using an ohmmeter, check that there is no continuity between terminals "3" and "5".
If the signal persists, replace the relay.
Apply battery voltage to terminals 1 and 2.
Using an ohmmeter, check for continuity between terminals "3" and "5".
If there is no signal, replace the relay.
Also, the removal and repair of the starter is described in the article - Removal and repair of the Toyota Camry starter


