Remove
Place the selector lever in the "N" position
Disconnect the wires from the battery terminals, starting with the negative terminal
Remove:
- – air intake pipe;
- - battery;
- - battery shelf;
- - injection computer with bracket;
- – air filter housing;
- – wiring harness attachments.
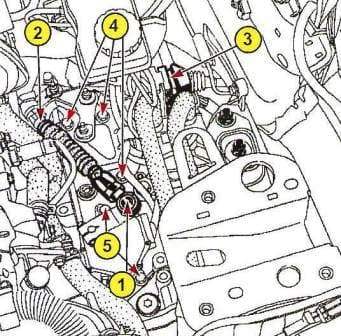
Preparing to remove the automatic transmission: 1 - ball tip; 2 — a cable of the multipurpose switch; 3 - block of wires; 4 - bolts for fastening the bracket of the modular connector; 5 - multifunction switch mounting bolts
Detach:
- - ball end of the multifunction switch drive cable (see 1 Fig. 1);
- – drive cable from the sheath stopper on the modular connector bracket (see 2 fig. 1).
Remove the two bolts of the multifunction switch lever (see 5 fig. 1).
Disconnect the modular jack by releasing its movable part (see 3 fig. 1).
Remove the three bolts securing the modular jack bracket (see 4 in Figure 1).
Remove the two bolts securing the modular jack bracket.
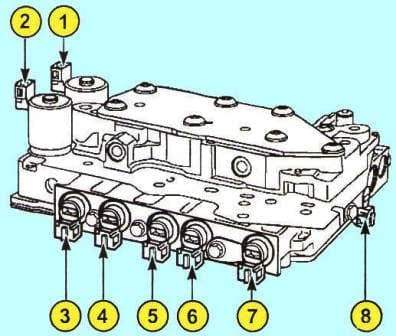
Location of solenoid valves: 1 - pressure control solenoid valve; 2 - solenoid valve for blocking the torque converter; 3 — the electromagnetic valve of sequence of a gear change; 4 - solenoid valve No. 3 of the gear shift sequence; 5 - solenoid valve No. 1 of the gear shift sequence; 6 - solenoid valve No. 2 of the gear shift sequence; 7 - solenoid valve No. 6 of the gear shift sequence; 8 - solenoid valve No. 5 of the gear shift sequence
Remove the green connector of the multi-function switch (12-pin) (see 1 fig. 23).
Installation
Set the multifunction switch to neutral "N".
Adjust the multifunction switch.
Installation is performed in the reverse order of removal.
Tighten the selector lever nut to the specified torque (10 Nm).
Check system operation and gear changes.
Multifunction switch adjustment
When the gear selector is in neutral, attach the two tips of a gauge to the position test leads.
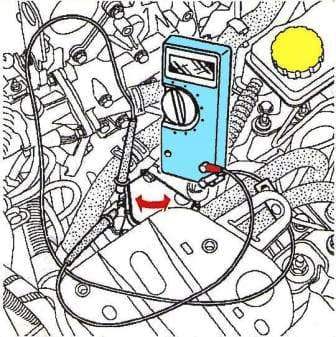
Set the multimeter to "ohmmeter" mode (Fig. 3).
Turn the multifunction switch manually until the switch closes (resistance at the switch contacts is 0 ohm).
Torque tighten (10 Nm) the mounting bolts of the multifunction switch.
After tightening the bolts, the electrical contact must be closed (0 ohm).
Check system operation and gear changes.


