Check the tension of the timing belt at every maintenance
When the belt is loose, its teeth wear out quickly and, in addition, the belt may jump on the toothed pulleys of the crankshaft and camshaft, which will lead to a violation of the valve timing and a decrease in engine power, and if there is a significant jump, it will be damaged
The manufacturer recommends checking the belt tension and controlling it with a special strain gauge tester.
In this regard, there are no data on the force when deflecting a belt branch by a certain amount in the technical documentation.
In practice, you can approximately estimate the correct belt tension according to the thumb rule: press on the belt branch with your thumb and determine the deflection with a ruler.
According to this universal rule, if the distance between the centers of the pulleys is between 180 and 280 mm, the deflection should be approximately 6 mm.
There is another way to pre-check the belt tension - by twisting its leading branch along the axis.
If you manage to twist the branch more than 90º with your hand, the belt is loose.

The car is equipped with an automatic timing belt tensioner.
Replace the timing belt if, upon inspection, you find:
- - traces of oil on any surface of the belt;
- — signs of wear on the serrated surface, cracks, undercuts, folds and delamination of the fabric from the rubber;
- - cracks, folds, depressions or bulges on the outer surface of the belt;
- - fraying or delamination on the end surfaces of the belt.
Be sure to replace a belt with traces of engine oil on any surface, as oil quickly destroys rubber.
Remove the cause of oil getting on the belt (usually a leak in the crankshaft or camshaft oil seals) immediately.
To work, you will need tools: socket heads for 10, 16, 18, a key for 13, TORX E14, a flat-blade screwdriver, a clamp for setting the TDC, a camshaft clamp.
Preparing the car for work.
We install the car on a viewing ditch or a lift.
Disconnect the negative battery terminal.
Some drawings and photos for clarity were taken on a removed engine

Remove the right front wheel.

Remove the right front wheel liner.

We unscrew the four bolts securing the bracket of the front of the subframe to the body and remove the bracket.

Remove the accessory drive belt (article Replacing the accessory belt Renault Megan 2 )

We unscrew the bolts of the right support and remove the right suspension support of the power unit

Having pressed the fixators, remove the top timing cover
Set the piston of the 1st cylinder to the TDC position of the compression stroke (article - How to set the TDC of the first cylinder K9K turbo Renault Megan 2).

Unscrew the plug of the crankshaft retainer and install the retainer

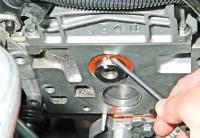
We unscrew the bolt securing the accessory drive pulley

Remove the pulley

After unfastening the latches and removing the plastic bolt, remove the lower cover of the timing belt.

Holding with a 6 hex wrench, loosen the tightening nut of the tension roller and remove the timing belt

Install the timing belt in the reverse order of removal.

When installing, the mark on the camshaft pulley (Fig. 14)

and the mark on the high pressure fuel pump pulley (Fig. 15) must match the marks on the belt.

The "B" mark on the high pressure fuel pump pulley must align with the "C" mark on the cylinder block.

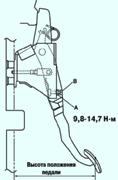
We tighten the belt, the arrow "A" on the tensioner should coincide with the slot "B".
Tighten the roller nut to 27 Nm.
Install the accessory drive pulley in the reverse order of removal.
Remove the clamps of the camshaft pulley and TDC
Turn the crankshaft by the auxiliary drive pulley bolt six turns.
Checking if the labels match.
If the marks do not match, reinstall the belt.
We install all the parts in the reverse order of their removal.
")
")
")
")
")
")