Removing the selector lever housing
Put the car on a two-post lift
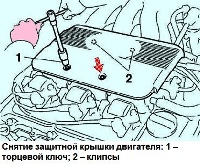
Remove the top engine covers.
Disconnect the battery.

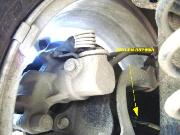
Remove the ball end of the multifunction switch cable and the drive cable from the sheath stopper on the modular jack bracket (Figure 1).
Remove the diagnostic connector cover.

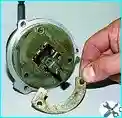
Turn the lever part a quarter of a turn, then lower it (fig. 2).

Remove the selector lever handle by pulling it up (fig. 3).

Remove the selector console trim (fig. 4).

Disconnect the selector connector and open the glove box (fig. 5)

Disconnect the parking brake handle trim (fig. 6).

Remove the bottom cover of the selector console (fig. 7)

Disconnect the cigarette lighter holder and disconnect the cigarette lighter socket (fig. 8).
Disconnect connectors for seat heaters (if equipped)
Remove both front seats.

Slightly slide the console in the direction of the arrow shown in Figure 9 and remove it
Removing the brake pedal of a car with an automatic transmission

Disconnect the glove box, the headlight range control switch from the rear, and disconnect the headlight range control switch panel connectors (fig. 10).

Remove the screws securing the automatic parking brake control knob (fig. 11).
Disconnect the connectors of the automatic parking brake control knob.
Remove the control knob.

Remove the front left pillar trim (fig. 12).

Remove the instrument panel side trim (fig. 13).

Unscrew the mounting bolts and remove the lower part of the dashboard (Fig. 14)

Remove the duct (fig. 15).
Remove the connecting shaft of the brake pedal - tie rod assembly.
Disconnect the accelerator pedal position sensor connector.
Disconnect the brake light switch connector.
Turn the brake light switch a quarter of a turn counterclockwise

Cut the pin (Fig. 16)
Insert pin (Fre1752) from left to right (in case the pedal is not replaced).

Unscrew the nuts securing the brake pedal assembly (Fig. 17).
Remove the brake pedal-accelerator pedal assembly.
Unscrew the fastening nuts and remove the accelerator pedal.
Pedal installation

The pedal has an unlocking system that is activated at the moment of a collision.
Do not touch the pedal system: the pedal may spontaneously drop to the floor.
Do not remove the pin before installing and tightening the fasteners of the pedal assembly.

Cut off the pin in the place shown by the dotted line in the figure.
Installation is performed in the reverse order of removal.
Torque tighten the brake pedal fork nuts to 21 Nm.

Remove the pin from the pedal (fig. 19)
Check the presence and blocking of the connecting shaft between the brake booster tappet and the brake pedal.
Adjust the position of the brake light switch.
Connect the wires to the battery terminals, starting with the positive terminal.
")
")
")
")
")
")