We install the gearbox on a special stand or workbench with the back cover up
With a 13 head, unscrew the three bolts securing the rear cover (Fig. 1).

Remove the cover.
The cover must be removed carefully along the horizontal axis of the box, since the cover has a lubrication tube that enters the input shaft hole.

Using a 27 head, unscrew the nut securing the fifth and reverse gear block gear (Fig. 2)

Using pliers, remove the lock washer (Fig. 3)

Using a drift (you can use the old valve) and a hammer, we knock out the fifth gear fork fastening pin (Fig. 4)
Using a puller, we remove the fifth gear along with the fork.

If there is no puller, you can use two powerful screwdrivers (Fig. 5)

Remove the plug (Fig. 6)

We remove the spacer washer (Fig. 7) (when removing the washer, you need to remember its position so as not to confuse it during assembly, the eighth figure shows the correct position of the washer)

Using the internal torxE-16 head, unscrew the bolt of the rear end of the secondary shaft (Fig. 9)

We remove the fifth gear with a three-finger puller or with B.Vi tools. 22.01 and B.Vi. 1000-01 (see fig. 10).
If there is no puller, you can use two powerful slotted screwdrivers, having previously screwed the bolt onto the rear end of the secondary shaft.

With a screwdriver, the assistant rests against the end of the gear, and with not strong blows on the bolt we compress the gear (Fig. 11).

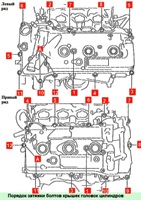
Using a TorxE-12 head (in some cases TorxE-14), unscrew 16 bolts securing the gearbox housing to the clutch housing (Fig. 12).
Five bolts are located inside the clutch housing.

Before disconnecting the crankcase, you need to attach the magnet to the fork stem so as not to lose the balls and springs of the retainers (Fig. 13)

We insert a thin slotted screwdriver between the thickened tides of the crankcases, and disconnect the gearbox crankcase with a hammer (Fig. 14).
The crankcase is sealed with a sealant adhesive.

After disconnecting the crankcases, we remove three springs and three retainer balls.

View of the spring and ball in Figure 15.
We remove the magnet installed in the gearbox (Fig. 16).
On the magnet you can see the wear chips of gearbox parts.

We knock out the pin of III and IV gears (Fig. 17)

And remove the stem along with the plug (Fig. 18)

Remove the retaining balls from the technological holes shown in Figure 19.

After that, we take out the secondary shaft (Fig. 20)

With a beard we knock out the pin from the reverse gear fork (Fig. 21)

Remove the input shaft and reverse clutch (Fig. 22)

After that, we wash all the parts and inspect the bearings.
If there are signs of wear, then we replace the parts.
Details of gearbox shafts are shown in Figure 23

Gearbox parts JH3:1 - oil deflector; 2,17,23 - bearings; 3 - secondary shaft; 4 - gear wheel of the 1st gear; 5 — a blocking ring of the synchronizer; 6 - hub of the synchronizer of the 1st and 2nd gears; 7,28,30 - springs; 8 - cracker; 9,16,22 - retaining rings; 10 - slotted washer; 11 - 2nd gear gear; 12 - gear 3rd gear; 13 - synchronizer hub of 3rd and 4th gears; 14 - gear 4th gear; 15 - thrust washer; 18 - gear wheel of the 5th gear; 19 - bolt of the rear end of the secondary shaft (70 Nm); 20 - front bearing; 21 - input shaft; 24 - thrust washer; 25 - gear bushing; 26 - gear 5th gear; 27 - synchronizer blocking ring; 29 - synchronizer hub; 31 - friction cone; 32 - synchronizer blocking ring; 33 - washer; 34 - nut of the rear end of the input shaft (190 Nm)
We prepare all the details for assembling the gearbox.
Gearbox Assembly will be covered in the next article - "JH3 Gearbox Assembly"
")
")
")
")
")
")