If the car won't start
Simple checks
Before checking, be sure to perform the starting procedure and make sure that there is enough fuel
Try starting the engine with other keys.
If it succeeds, your key may be faulty.
Check the key with your Toyota dealer.
If none of the keys work, there may be a problem with the engine lock system. Contact your Toyota dealer.
If the engine does not crank or cranks too slowly:
- 1. Check the battery terminals and make sure they are tight and not dirty;
- 2. If the battery terminals are OK, turn on the interior lighting;
- 3. If the light fades, dims, or goes out when the starter cranks the engine, the battery is dead.
In this case, you can try to start the engine using a booster battery.
Do not attempt to start the engine by towing or pushing. Doing so may damage the vehicle or cause a collision after starting the engine.
In addition, there is a risk of overheating of the three-way catalytic converter and subsequent ignition.
If the engine cranks at normal speed but does not start:
- 1. It is possible that the engine is flooded with gasoline as a result of repeated cranking of the crankshaft;
- 2. If the engine still does not start, it needs to be adjusted or repaired.
Contact your Toyota dealer or authorized repair shop.
Starting a flooded engine
If the engine does not start, it may be flooded with gasoline due to repeated cranking.
In this case, turn the key to the "START" position while keeping the accelerator pedal depressed as far as it will go.
Hold the key and the accelerator pedal in this position for 15 seconds, then release them.
Then try to start the engine without placing your foot on the accelerator pedal.
If the engine does not start after 15 seconds of cranking the engine, release the key, wait a few minutes and try again.
If the engine still does not start after this, it needs to be adjusted or repaired.
Starting with a booster battery
To avoid serious injury and damage to your vehicle from battery explosions, acid burns, electrical burns, and electronics damage, follow these instructions exactly.
If you do not understand any part of this procedure, we strongly recommend that you seek the help of a qualified mechanic or a towing service.

1. If the booster battery is installed on another vehicle, make sure the vehicles do not touch each other.
Turn off all unnecessary lights and accessories.
Use a battery that has the same or better specifications for starting.
Starting up with any other booster battery can be tricky.
If starting is difficult, charge the battery for a few minutes.
2. If necessary, remove all ventilation plugs from the additional and discharged batteries.
Cover open battery vents with a cloth (this will help reduce the risk of explosion, injury, and burns).
3. If the engine of the car with the booster battery installed is not running, start it and let it run for a few minutes.
When starting with a booster battery, the engine should run at approximately 2000 rpm-1 with the accelerator pedal lightly depressed.
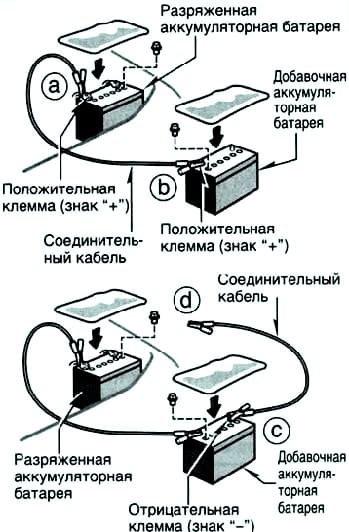
4. Connect the cables in the order a, b, c, d (fig. 1). a.
Connect the clamp of the positive (red) jumper cable to the positive (+) terminal of the discharged battery.
Connect the clip on the other end of the positive (red) jumper cable to the positive (+) post on the booster battery. c
Connect the clamp of the negative (black) jumper cable to the negative (–) terminal of the booster battery. d
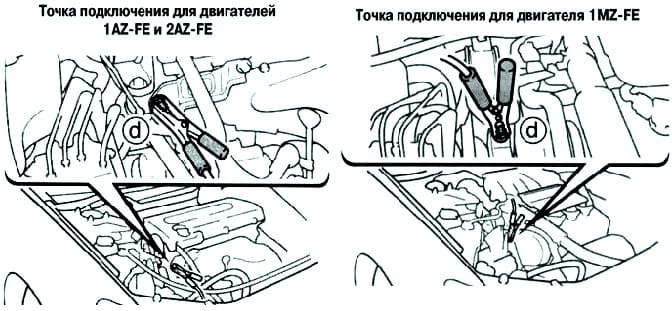
Connect the clip on the other end of the negative (black) cable to a hard, non-moving, unpainted metal point on the vehicle with the dead battery.

Recommended connection points are shown in Figure 2.
Do not connect the cable to or near any part of the vehicle that moves when the engine is cranked.
To avoid serious injury, when connecting the cables, do not lean over the battery or allow the connecting cables or clamps to touch anything other than the correct battery terminals or ground.
- 5. Start the engine normally.
After starting, the engine should run for a few minutes at approximately 2000 rpm–1 with the accelerator pedal lightly depressed.
- 6. Carefully disconnect the cables in exactly the reverse order: first the negative cable, then the positive one.
- 7. Carefully remove and discard cloths covering batteries as they may now be saturated with sulfuric acid.
- 8. If you removed the vent plugs, reinstall them.
If the first start attempt was not successful, make sure the clamp on the connection cables is firmly in place.
Recharge the discharged battery by connecting the jumper cables for a few minutes and start the engine normally.
If the engine stops while driving
If the engine stalls while driving.
- 1. Decrease your speed gradually while continuing to move in a straight line. Drive carefully off the road to safety.
- 2. Turn on the alarm.
- 3. Try starting the engine again.
If the car engine overheats
Overheating engine coolant as indicated by the gauge, loss of power, loud detonation, or humming noise indicates that the engine is likely to be overheated.
In this case, do the following.
- 1. Pull off the road carefully, stop the vehicle and turn on the hazard warning lights.
Put the transmission in P (automatic) or neutral (manual) and apply the parking brake.
If the air conditioning is on, turn it off.
- 2. If coolant or steam evaporates from the radiator or tank, stop the engine.
Open the hood only after evaporation has stopped.
If the coolant is not boiling or evaporating, keep the engine running and make sure the electric cooling fan is running.
If the fan is not working, turn off the ignition.
- 3. Look for visible coolant leaks from the radiator, hoses, and under the vehicle.
Please note that water leaking from the air conditioning system after operation is not a malfunction.
- 4. If a coolant leak is detected, stop the engine immediately.
- 5. If there are no visible leaks, check the coolant tank.
If the tank is empty, fill it with coolant while the engine is running. Fill it up to about half.
- 6. After the engine coolant temperature drops to normal, check the coolant level in the tank again.
Up to half if necessary.
A significant drop in the coolant level indicates a leak in the system.


