Place the gearbox on a workbench or stand
Before disassembly, we will analyze gearbox failures
The main symptoms of gearbox failures and how to find them
Noise or crackling when changing gear:
- - you need to check the oil level and its quality;
- - check the state of the gearshift drive;
- - check the synchronizers and their hubs.
One or more gears are not included:
- - check oil level and quality;
- - check the state of the gearshift drive;
- - check synchronizers.
- - check the shift forks and their retainers.
Spontaneous disengagement of gears:
- - check the condition of the power unit supports;
- - check the state of the gearshift drive;
- - check synchronizers and their hubs.
- - check the shift forks and their retainers.
Block one or more passes:
- - check the condition of the power unit supports;
- - check the state of the gearshift drive;
- - check the synchronizers and their hubs.
- - check the shift forks and their retainers.
- - check the condition of the gears.
Noises in gearbox:
- - check oil level and quality;
- - check the condition of the gearbox bearings;
- - check the condition of the gears.
Remove the bolts securing the clutch slave cylinder (Fig. 1)

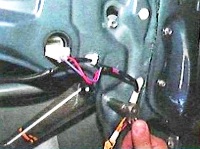
Remove the thrust pin of the gear selection mechanism (1), the neutral sensor and the reverse light switch (3), the ball detent of the gear selection mechanism (2) (Figure 2)

We also unscrew the screws securing the mechanism itself (shown by red arrows), and remove the mechanism assembly.
Remove the locks of the shift fork rods (5) and the plug (6).
Unscrew the bolts securing the gearbox housing to the clutch housing.

Spread the circlip of the secondary shaft bearing (Fig. 3)
After that, remove the gearbox housing.
Remove the latches of the gear selection rods (Fig. 4)

After that, remove the reverse fork limiter (2) (Fig. 4)
Remove the stem and the reverse gear (3)
Removing two anchors
Punch out with punch (or valve and as we used when disassembling the JH3 gearbox) if there is a device, as in Figure 5, remove the pin for securing the gear shift fork of the 5th and 6th gears.

Remove the stop half rings of the 5th and 6th gear shift leash (1) and remove the stem-fork assembly.

Remove the pushrod from the 5th and 6th shift shaft and the two detent balls
Remove the 3rd and 4th shift fork stop ring (see 1, fig. 6).
Using a tool, remove the 3rd and 4th shift lever pin.
Remove the 3rd and 4th shift shaft assembly with the fork.
Remove the tappet from the 3rd and 4th shift shaft.
Remove the 1st and 2nd shift fork retaining pin.
Remove the 1st and 2nd shift fork and stem assembly and reverse shift fork and stem assembly.
Together with an assistant, remove the “input shaft - output shaft - reverse intermediate gear axle” assembly.
")
")
")
")
")
")