")
")
")
")
")
")
The main malfunctions that require removal and disassembly of the clutch:
- - increased (compared to the usual) noise when the clutch is engaged;
- - jerks during clutch operation;
- - incomplete engagement of the clutch ("clutch slips");
- - incomplete clutch disengagement (clutch "leads").
The work of removing and installing the clutch is very laborious, so be sure to first make sure that the malfunctions are not caused by defects in the clutch actuator.
If, after disassembling the clutch, no obvious signs of malfunction of individual components are found, replace all components at the same time.
Because the gearbox must be removed before removing the clutch, work with a helper.
You will need: an “8” key, two screwdrivers, a mandrel for centering the driven disk (can be made from the input shaft of the gearbox by removing the gear).
- 1. Place the vehicle on a pit or lift.
- 2. Remove the gearbox (see "Removing and installing the gearbox")

If you install the old pressure plate, mark in any way (for example, by punching) the relative position of the disc casing and the flywheel in order to set the pressure plate in its original position (to maintain balance).

Remove the six bolts securing the pressure plate to the flywheel, holding the flywheel from turning with a mounting spatula.

Remove pressure plate and driven plate while holding the driven plate

Inspect the driven disk. Cracks on the parts of the driven disk are not allowed.
Check friction lining wear
If the rivet heads are recessed less than 0.2 mm and the surface
friction linings are oily or rivet connections are loose, then the driven disk (or friction linings) must be replaced.

Check that the damper springs are firmly fixed in the sockets of the hub of the driven disk.
If the springs are broken, replace the disc.
Check the runout of the driven disk if warping is found during visual inspection.
If the runout is greater than 0.5 mm, replace the disc.

Evaluate the condition of the diaphragm spring of the pressure plate by external inspection.
Cracks in the diaphragm spring are not allowed.
The points of contact between the petals of the spring and the clutch release bearing must be in the same plane and not have obvious signs of wear.
Checking the condition of the clutch pressure plate assembly
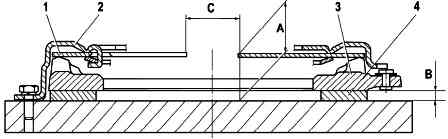
Fix pressure plate 3 (Fig. 7) complete with pressure spring 1 and casing 2 on the fixture with intermediate ring 4 with thickness B=(8.3+0.01) mm. This tool replaces the flywheel with driven disc.
Check by disengaging the clutch three times with a disengagement stroke of 8–9 mm, applying a load to the pressure spring lobes 1 at diameter C=34 mm. With this:
- – check that the turn-off stroke (8.0+0.1) mm corresponds to a pressure plate stroke of at least 1.4 mm;
- – the difference between the displacement values of the pressure plate 3 is not more than 0.25 mm;
- - "A" dimension must be within (35.7+1) mm;
- – the load on the petals of the pressure spring 1 on the diameter C with a stroke of (8.0+0.1) mm should be no more than 1330 N, the peak of the shutdown load should not be more than 1720 N.
Measure the depth of the annular wear of the pressure spring petals at the point of contact with the clutch release bearing, if the wear exceeds 0.8 mm, replace the clutch cover assembly with the pressure plate.

Install the clutch in the reverse order of removal.
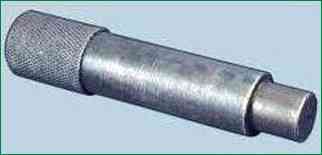
Before tightening the pressure plate mounting bolts, carefully center the drive plate with a drift.
If this is not done, the installation of the gearbox will be difficult.