")
")
")
")
")
")
The principle of operation of the air conditioner is almost the same as in a home refrigerator
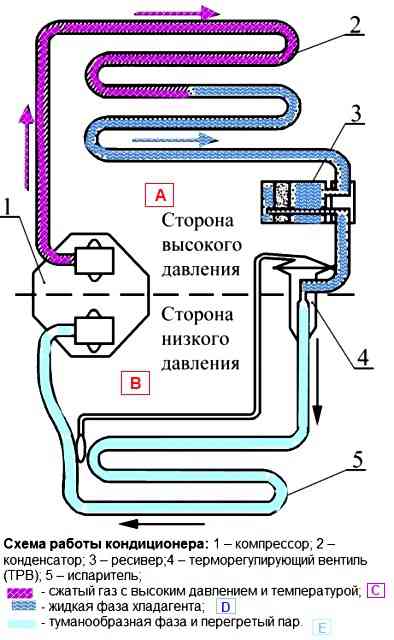
When the air conditioner is turned on, the air conditioner compressor starts
The compressor constantly compresses and circulates the refrigerant
During compression, the gaseous refrigerant turns into a liquid state, condensing in a condenser heat exchanger, releasing heat.
Further, during the reverse transition to the gaseous state, heat is absorbed in the evaporator heat exchanger.
Evaporator 5, which is located in the passenger compartment, constantly reduces the air temperature
The refrigerant transfers heat to condenser 2, which is located outside the passenger compartment, and is released from it. This cycle is repeated, and heat is constantly removed from the passenger compartment.
With the help of control, actuators maintain the necessary microclimate.
The refrigerant in Chevrolet Niva is R134a.
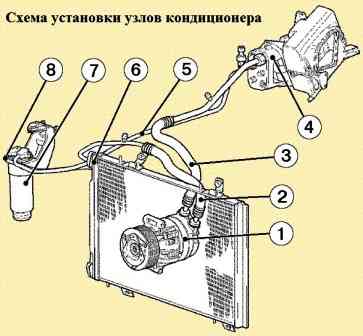
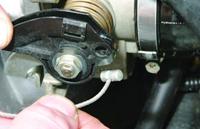
Compressor 1, Fig. 2, is the main and most complex unit of the system.
The compressor compresses a low temperature, low pressure refrigerant gas into a high temperature, high pressure gas.
The compressor is mounted on the engine bracket on the right side.
The compressor drive is carried out by a V-ribbed drive belt from the car engine through an electromagnetic clutch.
When voltage is applied to its winding, the driven disk and pulley rotate synchronously, setting the compressor shaft in motion.
The compressor is lubricated with special compressor oil circulating throughout the system along with the refrigerant.
The air conditioning system uses AT41244 (ISO 150) compressor oil.
The amount of refrigerant to charge the air conditioning system is 0.4 kg.
Compressor oil volume - 0.22 l.
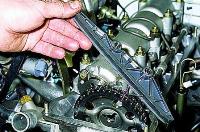
Aluminum condenser 6. It condenses (transition to a liquid state) the refrigerant pumped by the compressor with the release of heat into the atmosphere.
For better airflow, the condenser is installed in front of the radiator of the cooling system.
Evaporator 4 – aluminum heat exchanger. The transition of the refrigerant from a liquid state to a gaseous state (evaporation) occurs in it with the absorption of heat.
The evaporator is installed in the instrument panel in the path of the incoming air flow, which reduces its temperature.
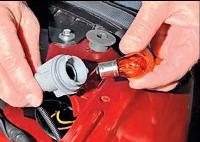
Receiver-drier 7 is installed on the condenser outlet pipe before the evaporator and serves as a reservoir for liquid refrigerant, cleans it from foreign impurities and water.
The receiver-drier can be equipped with a viewing window to control the amount of refrigerant.
Thermostatic expansion valve is installed on the evaporator and controls the amount of refrigerant entering the evaporator.
TRV is a device that provides a change in system performance depending on the conditions and mode of operation.
Pressure sensor sends a signal to the ECM to turn the A/C on/off depending on the pressure in the high pressure line
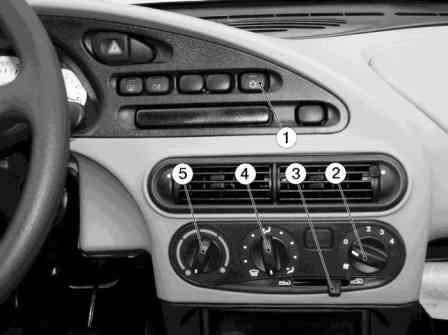
The air conditioning system is controlled in manual mode, by turning on the button (A / C) 1, Fig. 3, air conditioning control, temperature control knob 5 with blue and red zones, switch 2 revolutions of the system fan motor heating, switch 4 for air distribution throughout the passenger compartment (up, down, central part)
Dee air conditioning agnostic
Diagnostics are based on current pressure readings in the A/C system

If the readings are outside the ranges given in the table (reference table of pressure readings), the system is probably faulty
The following are the most likely causes of malfunctions based on low or high pressure gauge readings.
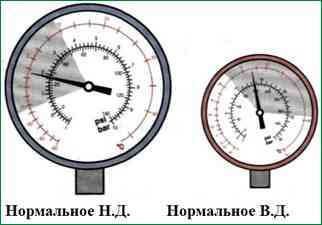
The figure shows a pressure gauge reading with a significant deviation from the norm
Note. The following "possible causes" are based on the statistical probability of failure
Manometer readings:
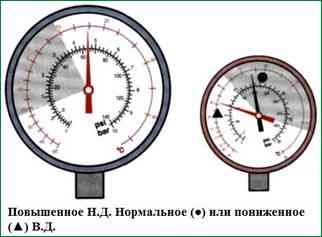
Possible causes of malfunctions:
- Suction and drain hose swapped when connected to compressor
- Compressor electrical clutch slipped or failed to engage
- Expansion valve stuck open. If the compressor is a variable displacement compressor, there will be slight but rapid fluctuations in low pressure
- Compressor displacement control valve misadjusted or defective
- Compressor damaged
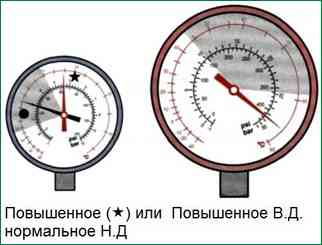
Manometer readings:
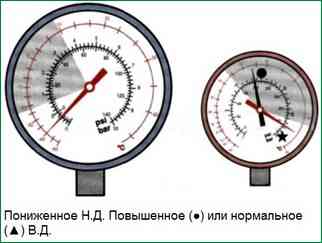
Possible reasons:
- - filter saturated with moisture;
- - Compressor displacement control valve stuck in position for maximum displacement
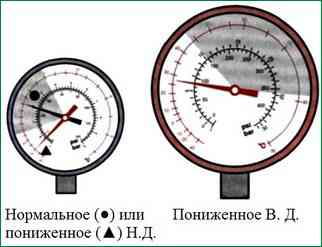
Manometer readings:
Possible reasons:
- - warm air has entered the evaporator unit or the cabin;
- - warm air entered the radiator;
- - ice on the evaporator core
Manometer readings:
Possible reasons:
- Normal at very high ambient temperatures (>43° C)
- 30-35% excess refrigerant
- Condenser overheating
- Presence of air in air conditioner hoses/pipes
- Faulty compressor displacement control valve
- Clogging of the high pressure line between the compressor and the evaporator, but after the high pressure measuring point
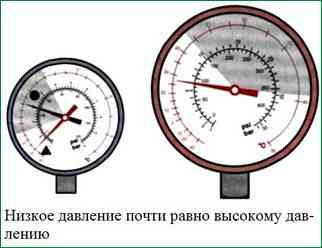
Manometer readings:
Possible reasons:
- Normal at very low ambient temperature (<5° C)
- Lack of refrigerant by 70-75%. Check for leaks
- Expansion valve stuck closed or expansion valve clogged
- Clogged high or low pressure line between filter and evaporator
- Clogged high pressure line between compressor and evaporator, but up to high pressure test point
- Compressor damaged
Manometer readings:
Possible reasons:
- - the compressor belt has come off. The probable cause is misalignment of the pulleys;
- - the compressor electric clutch slipped or did not enter the beat;
- - damaged compressor;
- - the compressor displacement control valve is faulty.
Possible malfunctions and solutions
The air conditioner is noisy
Note. The cause of the noise that is heard when the air conditioner is turned on for the first time is not a malfunction (activation of the electromagnetic clutch and operation of the compressor).
If you hear a constant noise even after a few minutes after the air conditioner stops working, check for one of the indicated causes of the malfunction and take appropriate measures.
- the belt is worn or slipped
Check belt wear and tension
- the tension pulley is noisy
Replace the idler
- the disc of the electric clutch slipped
It is necessary to ensure the distance between the compressor pulley and the electric clutch disc is 0.3-0.5 mm
- vibration and resonance of the compressor platter
Check the bolt torque and correct disc position. Check pulley alignment
- expansion valve "whistles"
If the noise is constant, the evaporator assembly needs to be replaced
- incorrect condensate drain
If the heater fan is suction, install a shut-off valve at the outer end of the condensate drain hose so that the condensate is drained to the outside and does not pump back making a gurgling noise.
Warning. In the following cases, several faulty air conditioner components create incorrect inlet and outlet pressure.
This phenomenon causes noise in the compressor, which is actually due to one of the following reasons and is not related to the compressor.
Wrong amount of refrigerant
Air, non-condensable gases or moisture in the air conditioner
- Wrong amount of refrigerant (30-35% more or 70-75% less):
Remove the refrigerant from the air conditioner. Suck out non-condensable gases and moisture from the air conditioner by running the vacuum pump for at least 15 minutes.
Check the tightness of the system with a pressure gauge. Charge the system with the recommended amount of refrigerant, as well as the oil removed from the system along with the refrigerant
- Expansion valve stuck closed / Expansion valve clogged:
Replace the evaporator assembly. Suck out non-condensable gases and moisture from the air conditioner by running the vacuum pump for at least 15 minutes. Charge the system with the recommended amount of refrigerant, as well as the oil removed from the system along with the refrigerant
- defective compressor displacement control valve:
Remove the refrigerant from the air conditioner. Replace compressor. Suck out non-condensable gases and moisture from the air conditioner by running the vacuum pump for at least 15 minutes.
Charge the system with the recommended amount of refrigerant, as well as the oil removed from the system along with the refrigerant
- the air conditioner circuit is clogged:
Locate the blockage by identifying an area in the circuit with a sharp temperature difference (high temperature above the blockage, low temperature below the blockage).
Remove the refrigerant from the air conditioner. Replace clogged component. Rinse the air conditioner thoroughly with a special cleaner and replace the drier filter to prevent dirt deposits resulting from blockage from settling in the circuit.
Evacuate non-condensable gases and moisture from the air conditioner by operating the vacuum pump for at least 15 minutes. Charge the system with the recommended amount of refrigerant, as well as the oil removed from the system along with the refrigerant
- filter saturated with moisture:
Remove the refrigerant from the air conditioner. Replace air conditioner filter. Suck out non-condensable gases and moisture from the air conditioner by running the vacuum pump for at least 15 minutes. Check the tightness of the system with a manometer. Charge the system with refrigerant and oil.
The air conditioner emits an unpleasant odor
- under certain conditions, mold and bacteria (usually found in the air) can form on the surface of the evaporator, which cause an unpleasant odor. Sometimes the smell occurs due to clogging of the condensate drain hose:
Use an antibacterial agent on the evaporator, clean the condensate drain hose
Advise the customer to turn off the A/C a few minutes before shutting down the car engine, leaving the blower fan on (this will dry the evaporator core from moisture that promotes bacterial growth)
The capacitor does not dissipate enough heat
- The air duct is clogged with dirt accumulated on the heat exchangers: water radiator, condenser (probably after 25000-30000 km of run)
Clean the radiator and condenser thoroughly
- The pressure switch or temperature-sensitive element does not turn off when the set pressure and temperature levels are reached
Switch off the control units with the appropriate electrical contact. If necessary, replace the defective component
- Electric fan not working
Connect the electric fan directly. If the fan still does not work, it need to replace
- The electric fan does not work correctly (wrong direction of rotation)
The fan is suction if it is between the heat exchangers and the engine, and exhaust if it is between the heat exchangers and the outside air inlet
- Water overheating in the engine cooling system
Check the original engine water cooling system
- Capacitor positioned incorrectly
Make sure the distance between the heatsink and the condenser is 15-20mm; if the distance is observed, check the correct position of the air ducts
Compressor electrical clutch slipping or not engaging
- Insufficient amount of refrigerant:
Find a refrigerant leak. Remove the refrigerant from the air conditioner. Suck out non-condensable gases and moisture from the air conditioner by running the vacuum pump for at least 15 minutes.
Check the tightness of the system with a pressure gauge. Charge the system with the recommended amount of refrigerant, as well as the oil removed from the system along with the refrigerant
- the electric coupling circuit is de-energized / The power supply to the circuit is unstable:
Disconnect the electrical coupling wire from the circuit and connect to the + terminal of the battery with a 7.5 A fuse
Replace the compressor assembly. If the electric clutch engages, check the pressure switch, thermostat, air conditioning control switch and electrical contacts
- incorrect distance between the compressor pulleys and the electric clutch disc:
The distance should be 0.3-0.5 mm
Ice on evaporator tubes
Note. This can happen as early as a few minutes after switching on, which will lead to a sharp decrease in the air flow blown out of the deflectors
- incorrect operation of the blower:
When the air conditioner is turned on, the fan must operate at least at the first speed. Otherwise, check the correct electrical connection
- defective compressor displacement control valve:
Replace the compressor
Compressor damaged
- bent valves, jamming:
Remove the refrigerant from the air conditioner
Remove the compressor
If the compressor is stuck, flush the air conditioner with a special product and replace the drier filter to prevent dirt deposits resulting from blockage from settling in the circuit
Install a new compressor
Evacuate non-condensable gases and moisture from the air conditioner by operating the vacuum pump for at least 15 minutes. Check the tightness of the system using a pressure gauge.
Charge the system with the recommended amount of refrigerant, as well as the oil removed from the system along with the refrigerant
Hot air enters the passenger compartment
- the heater radiator water valve (if any) does not close properly:
Check linkages and/or valve motor. Disable the heatsink if necessary
- the tightness of the air mixing and / or air recirculation dampers is broken:
Check linkages and/or valve motor
- the tightness of the evaporator insulation is broken:
Make sure the evaporator is sealed and properly connected to the original radiator to prevent warm air from entering