Fuel tank design
Assignment of valves and filler neck
Overpressure-vacuum safety valve
If the gasoline vapor recirculation circuit is blocked, this valve avoids the creation of excess pressure in the tank (tank swelling) or vacuum (due to fuel consumption, the tank is crushed).

Fuel tank: 1 - fuel tank, 2 - mounting holes, 3 - filler neck, 4 - filler neck mounting clamp, 5 - brake pipe mounting brackets, 6 - fuel supply pipeline, 7 - gasoline vapor supply pipeline; 8 - pipeline for removing gasoline vapors to the adsorber (coming from the fuel tank), 9 - communication with the atmosphere, 10 - adsorber, 11 - tank overflow prevention valve and fuel leakage prevention valve when the vehicle rolls over, 12 - anti-pressure tube (degassing when filling), 13 - fuel pump with level sensor assy
Limit valve
This valve prevents the tip of a leaded gasoline or diesel filling nozzle from being inserted into the filler neck.
An overfill prevention valve and a rollover prevention valve.
The working body of the overflow prevention valve is a ball.
When the car is stationary during refueling, the ball rests on the saddle, thereby blocking a certain amount of air in the tank.
When the car is moving, the ball moves away from the seat, opening a message between the tank and the adsorber.
There must be a certain amount of air in the tank filled with fuel.
This allows the fuel to expand without causing the tank to bulge.
The rollover prevention valve prevents the tank from emptying through the channel leading to the adsorber.

Scheme of operation of the fuel system: 1 - branch pipe for the pipeline going to the adsorber; 2 - ball valve to prevent overflow; 3 - anti-pressure tube during filling; 4 - restrictive valve; 5 - overpressure-vacuum safety valve; 6 - hole for air release during refueling; 7 - cavity for fuel expansion; 8 - filling hole; 9 - useful volume of fuel; 10 - valve to prevent overfilling of the tank and the valve to prevent fuel leakage when the vehicle rolls over
Filler neck
The filler neck for unleaded petrol has:
- - filler hole with a smaller diameter than a conventional filling nozzle (restriction valve).
The use of leaded gasoline will damage the emission control system
- - oxygen sensor and catalytic catalyst;
- - a valve that closes the filling hole to prevent gasoline vapors from escaping or gasoline leaking out;
- - hermetic stopper.
Removing and installing fuel tank Renault Megane 2

Fuel tank: 1 - breather hose, 2 - filler hose, 3 - rear bracket, 4.5 - thermal screen mounting brackets, 6 - adsorber hose, 7 - adsorber supply hose, 8 - left bracket, 9 - fuel tank, 10 - fuel module, 11 - right fuel tank bracket
Remove the fuel tank if a leak is detected or, if necessary, flush the fuel tank.
It is more convenient to remove the empty fuel tank.
If, of course, there is a lot of fuel in the tank, then you need to pump it out through the fuel module installation hole.
Before removing the tank, relieve the pressure in the fuel line.
Disconnect the negative battery terminal.
Disconnect the harness block and fuel lines from the fuel module.
Remove the rear suspension beam (you can of course not remove the rear suspension beam, then in this case you will have to tinker).

Remove the bolts securing the catalytic converter pipe to the exhaust manifold

Remove bolts with springs

Disconnect from the pillows and remove the muffler assembly.

Remove the thermal screen of the pipe of the additional muffler

We press the retainer of the fuel tank breather hose

Disconnect the hose from the filling pipe

We unclench the antennae of the clamps of the clamp for fastening the hose of the filling pipe

Bending the upper part of the clamp retainer

Bending the lower part of the clamp retainer

Open the clamp and disconnect the hose from the fuel tank pipe

Install the support under the fuel tank

Remove the left fuel tank bolt

Unscrew the rear mounting bolt

Unscrew the front bolt of the fuel tank
Remove the fuel tank.
Be careful not to damage the brake pipes and parking brake cable when removing.
Installation
Straighten the heat shield.
Make sure that the heat shield did not touch the fuel tank.
The fuel tank hose clamps must be replaced with new ones.
Installation is performed in the reverse order of removal.
Torque tighten:
- - wheel bolts (110 Nm);
- - fuel tank mounting bolts (21 Nm).
Check that the fuel lines are secure.
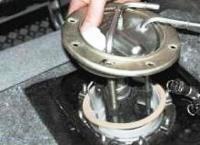
Install the fuel module.
Connect the wires to the battery terminals, starting with the positive terminal.
")
")
")
")
")
")