")
")
")
")
")
")
Remove the battery cover.
Disconnect the negative cable from the battery.
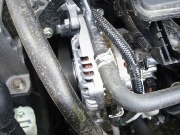
Remove the air filter
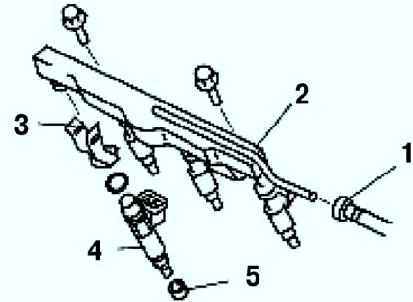
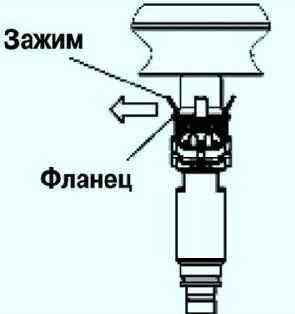
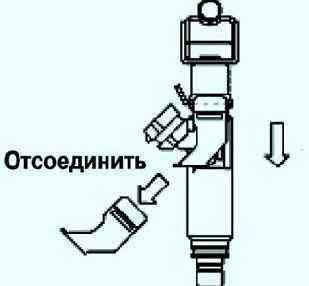
Disconnect the fuel injector connector.
Remove the quick connector.
Remove the fuel distributor.
If the fuel injector flange or coated fuel distributor element is damaged, it may cause fuel to leak.
Remove the fuel injector clip carefully to prevent damage (fig. 2).
Using a deformed fuel injector clip may cause incorrect fuel injector installation and fuel leakage.
After removing the fuel injector, replace the clip with a new one.
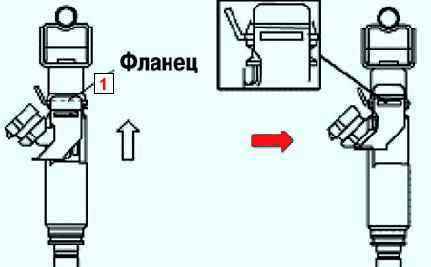
Peel off one side of the fuel injector clamp from the fuel injector flange (fig. 3).
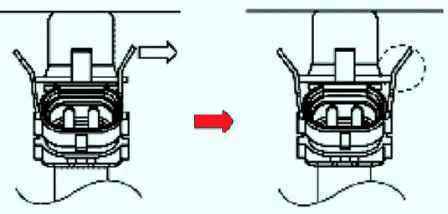
While holding the side of the fuel injector clip that was removed during the first step to prevent it from snapping back into place, remove the other side of the fuel injector clip (fig. 4).
Remove the fuel injector clamp by sliding it axially (fig. 5).
Install
Apply a small amount of clean oil to the new O-ring.
A damaged o-ring can cause fuel to leak.
Be careful not to damage the O-ring when installing the fuel injector.
If there are foreign objects on the connecting part of the fuel injector, the fuel injector and fuel distributor may be damaged.
To prevent damage, clean the connecting part before connecting the fuel injector.
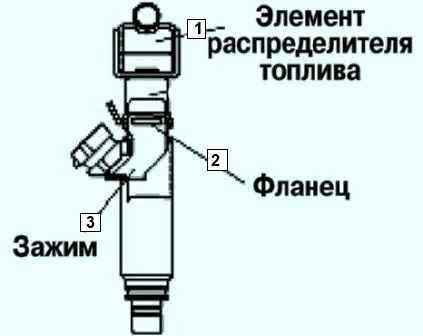
Install the fuel injector directly into the hole (fig. 6).
Check that the fuel injector rotates smoothly. If not, install the fuel injector again.
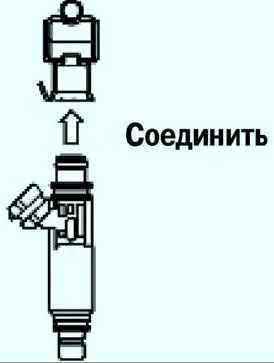
Install the new fuel injector clamp onto the fuel injector and install the retainer on the bottom of the fuel injector connector.
Insert the fuel injector flange into the groove of the fuel injector clamp and slide the fuel injector clamp over the injector, keeping the groove of the fuel injector clamp parallel to the fuel injector flange (fig. 7).
Make sure the fuel injector flange is fully inserted into the groove.
Checking and replacing the injector of the 1.6 l engine
Preparing the car
Remove the lower part of the air filter housing

Disconnect the wiring harness block from the injector

Using a tester in ohmmeter mode, we check the resistance of the injector winding, for which we connect the tester leads to the injector contacts
Resistance should be about 14 ohms, otherwise the nozzle needs to be replaced
Also check the rest of the injectors
Using two wires directly from the battery, we briefly apply 12 volts to the injector contacts.
A good injector should have a characteristic click when the valve opens. Replace defective injectors
Replacing nozzles
Preparing the car
Relieve fuel pressure in the fuel line
Disconnect the wiring harness pads from the injectors

Squeeze the latch and disconnect the fuel line from the fuel rail

Use a 12 socket wrench to unscrew the fuel rail mounting bolts

Remove the fuel rail assembly with injectors by pulling up
If one or more injectors remain in the intake piping, the clips of these injectors must be replaced

Bend the tabs of the latch and remove the nozzle from the fuel rail
Replace the upper O-rings of the injectors each time the fuel rail and injectors are disconnected

Remove the nozzle retainer

Pry off the top sealing ring of the injector with a screwdriver and remove it

In the same way, remove the lower (2) and middle (1) o-rings
Install parts in reverse order
When installing the sealing rings, make sure that they are not twisted
To facilitate the installation of the injector, lubricate the O-rings of the injectors with technical petroleum jelly or gear oil
Checking and replacing the injector of the 2.0 l engine
Preparing the car for the task
Remove the engine trim

Disconnect the harness block from the injector
Using a tester in ohmmeter mode, we check the resistance of the injector winding, for which we connect the tester leads to the injector contacts.
Resistance should be in the range of 11.5-12.6 Ohm, otherwise we replace the nozzle
Also check the rest of the injectors
Using two wires directly from the battery, we briefly apply 12 volts to the injector contacts.
A good injector should have a characteristic click when the valve opens. Replace defective injectors
Replacing nozzles
Preparing the car
Disconnect the wire blocks from the injectors

Remove the wire harness holders from the fuel rail


Turn the lock and disconnect the fuel line from the fuel rail

Using a 10 socket wrench, unscrew the bolts securing the fuel rail and remove it complete with injectors by pulling it up
Warning: If one or more injectors remain in the intake manifold, the injectors must be replaced.
Replace the injector O-rings each time you remove the fuel rail or injector

Bend the tabs of the latch and remove the nozzle from the fuel rail

Pry off the top sealing ring of the injector with a screwdriver and remove it

In the same way, remove the lower sealing ring

The upper and lower injector O-rings are not interchangeable and have different colors
Install parts in reverse order
When installing the sealing rings, make sure that they are not twisted
To facilitate the installation of the injector, lubricate the O-rings of the injectors with technical petroleum jelly or gear oil