The Renault Megan 2 dashboard is a collapsible design consisting of a decorative panel and an amplifier
The decorative panel is made of plastic and is attached with screws to the amplifier.
Control devices and controls of the car and the air conditioning and heating system are attached to the panel.

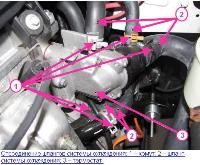
Instrument panel: 1 - block of regulators of the electric corrector for headlights and brightness of the illumination of the instrument cluster; 2 — a combination of devices; 3 - information display; 4 - control unit for the heating (air conditioning) and ventilation system; 5 - the head unit of the audio system; 6 - passenger airbag; 7 - glove box; 8 - lining of the floor tunnel; 9 - central overlay of the instrument panel
Heating air ducts are attached to the decorative panel from the inside.

The front passenger airbag is also installed in the instrument panel.

The amplifier is made of steel reinforcement, to which the steering column, wire harnesses, electrical equipment devices are attached.
Before working on the safety components, the airbag computer must be locked using the diagnostic tool.
At the same time, all ignition circuits are blocked, and the airbag warning light on the instrument panel lights up with a constant light (when the ignition is on).
When the airbag computer is locked, the electric steering lock is also unlocked.
It is strictly forbidden to work with pyrotechnic systems (airbags and seat belt pretensioners) near sources of heat or open flames, as there is a risk of airbags or seat belt pretensioners deploying.
Removing the decorative instrument panel
Disconnect the negative battery terminal.

Remove the steering wheel

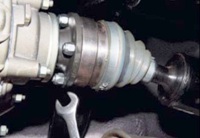
Remove the steering column cover and the energy-absorbing element

Remove the steering column switches assembly with holder and slip ring

Remove instrument cluster – Instrument panel replacing Renault Megane II

Pull back the upper part of the fasteners of the cover of the mounting block

And open the cover of the mounting block

Pry off the left panel trim with a screwdriver

Overcoming the resistance of the fasteners, remove the left trim of the instrument panel

We unscrew the four screws securing the lower left trim of the instrument panel, move the trim to the side by the length of the wiring harness

Press the pad lock

Disconnect the wiring harness block from the connector of the control unit of the headlight electric corrector and the brightness of the instrument cluster backlight

Remove the lower left trim of the instrument panel assembly with the control unit for the electric corrector for the headlights and the brightness of the illumination of the instrument cluster, as well as the cover of the mounting block.

Overcoming the resistance of the latches, we move the display lining aside

We press the latches and disconnect the two wire blocks from the information display

We unscrew the two screws securing the instrument panel located under the display trim

Removing the floor panel trim - Replacing the Renault Megan 2 center console

We unscrew the two screws of the lower fastening of the central lining of the instrument panel

We pry off the body of the niche for small things with a screwdriver

Removing the body of the niche for small items

Pry off the audio system bracket with a screwdriver and remove the audio system mounting bracket

We unscrew the two screws securing the central trim of the instrument panel

We set aside the central trim of the instrument panel for the length of the wiring harness

We press the latches and disconnect the three pads of the wiring harness from the buttons

We unscrew the four screws securing the central nozzles of the heating and ventilation system

Remove the central nozzles

Remove the control unit for the heating and ventilation system

Pry off the plug with a screwdriver

Remove the cap of the screw securing the lining of the glovebox

We unscrew the screw securing the lining of the glove box

We unscrew the three screws securing the glove box to the instrument panel amplifier

We pry off with a screwdriver and set aside the right trim of the instrument panel for the length of the wire harnesses

Press the latch of the airbag pad

Disconnect the wire block from the switch Front Passenger Airbag Deactivator

Finally remove the right instrument panel lining

Remove the lining of the right front pillar.
We also remove the lining of the left A-pillar

We unscrew the three screws securing the instrument panel to the instrument panel amplifier on the right

Remove the glove box body

We unscrew the screw securing the instrument panel on the passenger side

Pry off with a screwdriver

Remove the dashboard console shields

Remove the latch

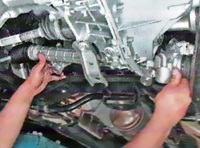
Disconnect the wiring harness block from the passenger airbag

Press out the latch
We set aside the length of the wiring harness for the glove box lighting.

Disconnect the block and remove the glove box light

We unscrew the two screws securing the instrument panel under its central trim

We unscrew the instrument panel mounting screw located behind the instrument cluster

Remove the instrument panel mounting screw under the instrument panel center trim

Removing the sun visors

Remove the lining of the front pillars

Remove the decorative panel
Install the decorative panel in reverse order.
Be sure to replace the nuts securing the passenger airbag to the dashboard each time you remove the passenger airbag.
Tighten the screws securing the airbag module to the required torque of 2 Nm.

Install two stoppers (fig. 53).
Both stoppers must be replaced.
Before proceeding with installation, make sure the wheels are still in the straight-ahead position, and the steering column switch box is opposite the mark.

The steering wheel must fit freely into the splines (the splines have orienting sections) (Fig. 54).
Be careful not to damage the splines of the orienting areas.
Be sure to replace the mounting bolt every time you remove the steering wheel.
Tighten the steering wheel bolt to 440 Nm.
Check the airbag computer with a diagnostic tool.
Check that the airbag connectors are secure and locked.
Connect the ground wire of the passenger airbag module.
Tighten the holder fixing screw to the required torque of 20 Nm.
Unlock the airbag computer using the diagnostic tool.
Connect the wires to the battery terminals, starting with the positive terminal; do the necessary programming.
Tighten the bolts securing the battery cover to the required torque of 4 Nm.
The rest of the components are installed in the reverse order of removal.
")
")
")
")
")
")