Removing and installing catalytic converter (F4R engine)
To remove the pre-catalytic converter, remove the engine
Unscrew the mounting bolts and remove the heat shield (fig. 1).
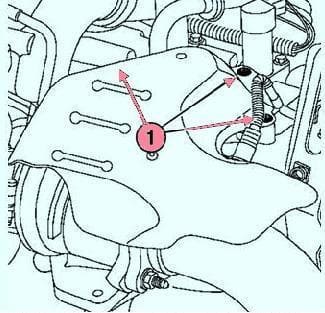
Disconnect the wire blocks from the oxygen sensors.
Remove the top mount bracket and top brace.
Remove the catalytic converter strut mounting bracket from the transmission.
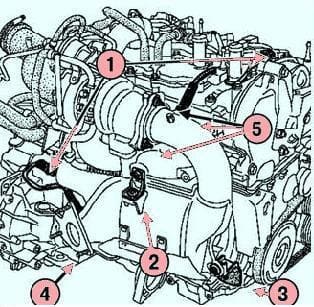
Remove the catalytic converter mounting nuts on the turbocharger and remove the catalytic converter (fig. 2).
Remove the oxygen sensors on the workbench.
Replace the gaskets of the exhaust pipe flange and turbocharger.
Installation
Install oxygen sensors.
Tighten to the required torque (38 Nm) the bolts securing the upper strut to the engine.
Fold to touch in this order:
- - top mounting bracket bolts;
- - nuts for fastening the catalytic converter to the turbocharger;
- - catalytic converter mounting bolt on the upper strut.
Tighten in order to the correct torque:
- - bolt for fastening the catalytic converter to the upper strut (8.5 Nm);
- - bolts for securing the upper tab to the exhaust manifold (8.5 Nm);
- - bolts for securing the upper tab to the pre-catalytic converter (8.5 Nm);
- - nuts securing the catalytic converter to the turbocharger (40 Nm);
- - oxygen sensors (34 Nm);
- - exhaust pipe flange mounting studs (8.5 Nm).
Installation is performed in the reverse order of removal.
For more details, see the article - Replacing mufflers and pipes Renault Megan 2
Removing and installing catalytic converter (K4J, K4M engines)
Put the car on a two-post lift.
Disconnect the wires from the battery terminals, starting with the negative terminal.
Remove the engine undertray.
Remove the downstream oxygen sensor.
Cut the exhaust pipe.
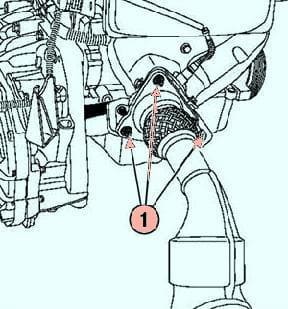
Unscrew the nuts securing the exhaust pipe flange and remove the catalytic converter (Fig. 3).
Installation
Install the downstream oxygen sensor.
Do not use a used coupling. When assembled, the coupling bolt and nut must not come into contact with the bottom of the body.
A damaged heat shield must be replaced.
Torque tighten (45 Nm) the oxygen sensor using tool (Mot. 1495-01).
If necessary, torque tighten (7 Nm) the exhaust pipe flange mounting studs.
Install catalytic converter and clutch
The rest of the equipment is installed in the reverse order of removal.
Be sure to replace the exhaust flange gasket and any disconnected plastic air inlet lines.
Torque tighten (21 Nm) the exhaust pipe flange mounting nuts.
Tighten the coupler, unloading the exhaust pipe to make it level.
Connect the oxygen sensor.
Check that all exhaust system heat shields are present and secure.
Install the engine undertray.
Make sure the exhaust pipe is not in contact with the underbody.
Connect the wires to the battery terminals, starting with the positive terminal.
For more details, see the article - Replacing mufflers and pipesub Renault Megan 2
Removing and installing additional muffler (all engines)
Put the car on a lift.
Remove the engine undertray.
Cut the exhaust pipe.
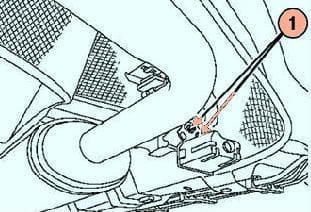
Unscrew the bolts securing the additional muffler to the cushion bracket and remove the additional muffler (Fig. 4).
If the suspension pads are damaged, mark the position of the bracket on the body, then replace the suspension pad and bracket assembly.
Installation
Cut to size the pipe of the new additional muffler.
Install additional muffler and clutch.
Torque tighten:
- - bolts for attaching the suspension cushion bracket to the additional muffler (8 Nm);
- - bolts for attaching the suspension cushion bracket to the body (21 Nm).
Tighten the coupling while unloading the exhaust pipe to line it up.
Make sure all exhaust piping heat shields are present and secure.
Make sure the exhaust pipe is not in contact with the underbody.
For more details, see the article - Replacing mufflers and pipes Renault Megan 2
Removing and installing the main muffler (all engines)
Put the car on a two-post lift.
Cut the exhaust pipe.
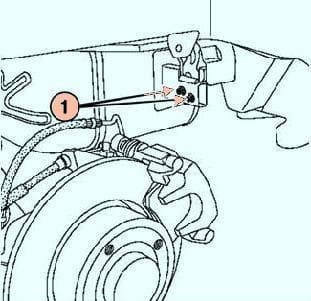
Remove the bolts securing the main silencer to the suspension cushion bracket and remove the main silencer (Fig. 5).
Install the main muffler and clutch.
Torque tighten:
- - bolts for fastening the suspension cushion bracket to the muffler (8 Nm);
- - bolts for attaching the suspension cushion bracket to the body (21 Nm).
Tighten the coupling while unloading the exhaust pipe to line it up.
Make sure all exhaust piping heat shields are present and secure.
Make sure the exhaust pipe is not in contact with the underbody.


