")
")
")
")
")
")
The camshaft is replaced in the following cases:
- ─ the pressure in the engine lubrication system has dropped. The cause of this malfunction is often increased wear on the camshaft journals and the camshaft bearing seats in the cylinder head
- - When the sockets are worn out, the head of the block assembly is replaced, since the sockets are made directly in its body;
- ─ valve knock, which is not eliminated by adjusting the clearances in the valve drive mechanism. May occur due to increased wear of the camshaft cams due to the use of low-quality engine oil or damage to the oil filter.
When the camshaft cams are very worn, it is often necessary to replace the valve rockers simultaneously with its replacement.
Due to the layout of the engine compartment of the Renault Logan car, it is not possible to remove the camshaft directly on the car.
To do this, you need to remove the cylinder head.
Remove the cylinder head (see "Replacing the cylinder head gasket").

Evenly loosening the tightening, unscrew the five bolts securing the axis of the rocker arms...
Please note that the bolts have different head shapes.
Install the bolts when reassembling in their original places.

Remove the axle assembly with rocker arms.

If you do not intend to replace the rocker arms and their axis, do not remove the rocker arms to install them in their original places during assembly.

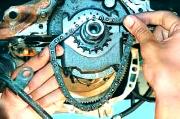
Holding the camshaft from turning with a hexagon wrench.

The hexagon for holding is cast at the front journal of the camshaft bearing.


Remove the camshaft sprocket bolt.
Remove the pulley.


Using a screwdriver, remove the camshaft oil seal from the socket in the head of the block.
Replace the camshaft oil seal with a new one each time you remove it.


At the rear end of the block head, unscrew the two screws securing the camshaft thrust flange and remove the flange.

Carefully, trying not to damage the working surfaces of the bearings with the sharp edges of the cams, remove the camshaft from the beds of the block head

Inspect the camshaft. The surfaces of the bearing journals 2 and Cams 1 should be well polished and without damage, and in the groove a under the thrust flange there should be no signs of excessive wear and nicks.
On the working surfaces of the necks 2, scuffing, nicks, scratches, aluminum enveloping from the bearing seats in the block head are not allowed.
If there are signs of seizing, overheating, deep scratches or wear in the form of a cut, as well as uniform wear of more than 0.5 mm, on the working surfaces of the cams 1, replace the shaft.
Thoroughly clean the channel b for supplying oil in the middle support neck from deposits.
Grinding the camshaft cams to eliminate stepped wear is prohibited, since changing the size of the cam profile will disrupt the valve timing.
In workshops equipped with special tools and fixtures, the radial runout of the camshaft journals can be checked.
If its value is more than 0.02 mm or misalignment of the journals, replace the shaft, as its editing is not allowed:
When installing a new camshaft, we recommend replacing the rocker arms with new ones.
Before the first engine start and to improve conditions; running-in, we recommend adding an anti-seize anti-friction additive to the engine oil.
After installing the camshaft, check its end play. If it is more than 0.15 mm, replace the thrust flange,
Install the camshaft in the head of the block and all removed parts in the reverse order of removal.
Mount the cylinder head to the engine (see Replacing the cylinder head gasket).