")
")
")
")
")
")
On the VAZ-2123 car, block headlights are used that combine low and high beam headlights (with single-filament lamps) and direction indicators. In addition, the headlights are position light bulbs
The headlight switch-on diagram is shown in the figure.
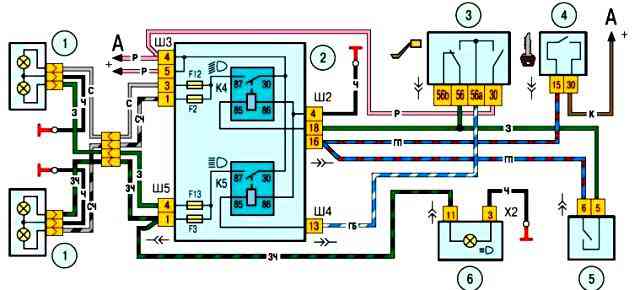
The dipped and main beam headlights are switched on using auxiliary relays K4 and K5 located in the mounting block.
The control voltage to the relay windings is supplied from the headlight switch 3, if the key of the outdoor light switch 5 is fully pressed.
When the low beam is turned on, the low beam lamps are on, and when the high beam is turned on, all lamps (both low and high beams) are on.
Regardless of the position of the switch button 5, you can turn on the main beam for a short time by pulling the headlight switch lever 3 towards you.
In this case, the voltage to the contact "30" of switch 3 is supplied directly from the power sources.
Lamps used in the headlight unit:
- - high beam lamp - AKG 12-55 (H1)
- - low beam lamp - H7
- - turn signal lamp - PY21
- - side light lamp - A 12-5-2 (W5W)

To replace the high beam lamp, remove the protective rubber cover from the headlight housing.

Disconnect the wiring harness from the lamp

Compress the ends of the spring retainer, disengage them from the hooks of the reflector and remove the retainer from the lamp

Remove the high beam bulb from the headlight housing
Install the high beam lamp in reverse order.
Replacing low and side light bulbs

Remove the protective rubber cover of the dipped and side light lamps.
Disconnect the wire ends from the lamp leads.
Press the upper end of the spring clip (shown by the arrow), disengage the clip from the hooks of the reflector and move it away from the lamp.

Remove the low beam bulb from the headlight housing
Install the low beam H7 lamp in reverse order.
To replace the parking light bulb -

Pull out the lamp socket

Remove the cartridge with the lamp from the headlight housing.

Remove the lamp from the socket
Install the lamp in reverse order
To replace the turn signal bulb

Turn the lamp socket counterclockwise (shown by the arrow)

Remove the cartridge with the lamp from the headlight housing.
Click on the lamp and turn it counterclockwise until it stops

Remove the lamp from the socket
Install the indicator lamp in reverse order
Removing the headlight assembly and replacing the headlight glass
Disconnect the negative battery terminal.
Remove the license plate.

With a 10 head, we unscrew the two bolts hidden under the license plate

Loosen the two nuts securing the lower bumper brackets to the body

We unscrew the three screws securing the upper part of the bumper to the upper cross member of the radiator frame.

We move the upper part of the bumper forward and upward, then, after inserting a slotted screwdriver into the gap, we squeeze out the hidden tongue of the decorative plastic lining that covers the lower part of the headlight

This is the tongue you need to bend down

We take the edge of the bumper down and, after inserting a Phillips screwdriver into the gap, loosen the self-tapping screw of the decorative plastic trim.

We disengage the four latches that secure the decorative plastic trim to the bumper and remove the trim from the headlight (the trim is still attached with double-sided tape).

Unscrew the bumper mounting screws located under the trim

Squeeze the two clamps of the block, disconnect the block of wires from the headlight connector

Remove the front bumper so as to gain access to the lower bolts of the headlight and unscrew the two bolts with a 10 head

With a 10 head, we unscrew the two bolts of the upper fastening of the headlight

Sliding the headlight forward, pry off the block retainer with a screwdriver, disconnect the wire block from the direction indicator lamp socket

Remove headlight
Install the headlight in reverse order
To replace the headlight glass

Pry off with a screwdriver

Remove the seven glass latches

Removing the glass

The connection between the glass and the headlight housing is sealed with a rubber gasket
Install all parts in reverse order.