")
")
")
")
")
")
Door interior design includes: power window regulator, interior handle, door speaker, harness and internal baffles
A wavy shaped side impact bar is used to increase rigidity in the event of a collision.
Thanks to the integrated door unit, the weight of the door as a whole has been reduced.
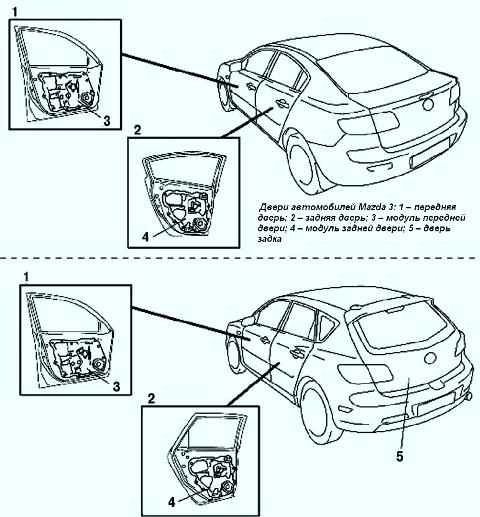
Waterproofing of the internal elements of the door block is provided by a sectional design.
Fiberglass-reinforced plastic is used to increase rigidity.
In addition, recyclable substances are used in the unit to protect the environment.
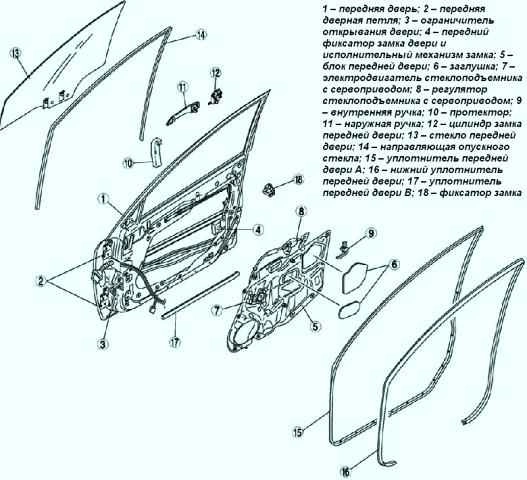
Removing and installing the front door
Disconnect the negative cable from the battery.
To remove the door stopper, remove the following items:
- - interior decoration;
- - window handle (vehicles with mechanical windows);
- - front door trim;
- - front door speaker.
To remove the front door hinges, remove the following items:
- - windshield wiper arm with brush;
- - front grille;
- - front bumper;
- - front combined headlights;
- - side molding (cars with side molding);
- - front fender panel.
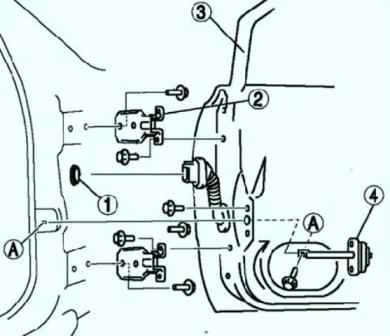
Remove in the order shown in Figure 4.
Press the rubber boot back.
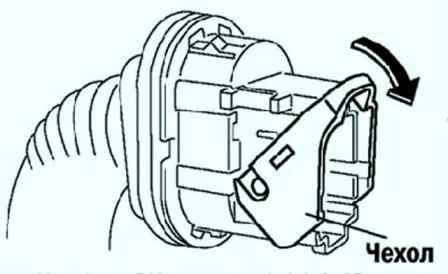
Remove the cover in the direction of the arrow and disconnect the connector (fig. 5).
Install in the reverse order of removal.
Adjust the front door.
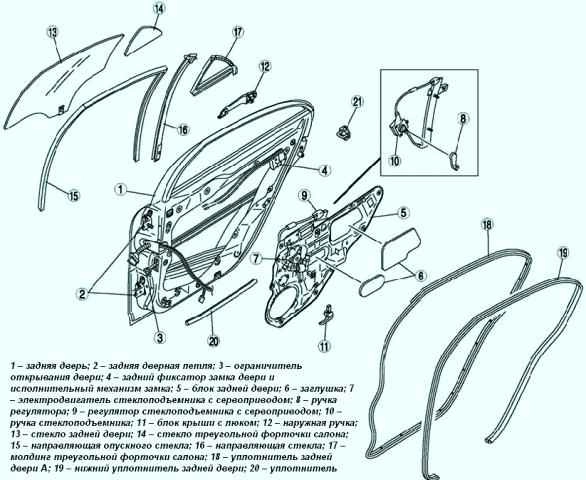
Removing and installing the rear door
Incorrect handling of the side airbag sensor can cause accidental deployment of the airbag, which can cause serious injury.
The side airbag sensor is located in the B-pillar.
Disconnect the negative battery cable.
To remove the door stop, turn the rear door speaker.

Remove in the order shown in Figure 6.
Install in the reverse order of removal.
Adjust the front door.
Door adjustment
Measure the clearance and height difference between the front or rear door and the body (fig. 7).
Loosen the door hinge bolts or the door lock retainer screws, and adjust the door.
Regulatory clearance:
- a - 2.7–4.7 mm;
- b - (top) 1.0-1.0 mm;
- b - (middle) 0.5-1.5 mm;
- b - (bottom) 0.3–1.3 mm;
- c - (top) 1.0-1.0 mm;
- c - (bottom) 0.5–1.5 mm;
- d - (top) 1.0-1.0 mm;
- d - (bottom) 0.5-1.5 mm.
Tighten the bolts or screws.
Adjusting the tailgate
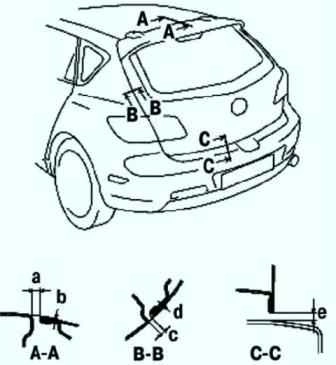
Measure the clearance and height difference between the tailgate and the body (fig. 8).
Loosen the tailgate hinge nuts and adjust the tailgate.
If necessary, loosen the tailgate lock retainer bolts and adjust the tailgate.
Regulatory clearance:
- a - 5.0-7.0 mm;
- b - 2.0-0 mm;
- c - 3.5-6.5 mm;
- d - 1.7-0.7 mm;
- e - 4.0-8.0 mm.
Tighten the nuts or bolts.