Exhaust gases are discharged from the engine through its exhaust manifold into the exhaust pipe 13, the converter 7, the additional silencer 8 and the main silencer 9.
To eliminate bending loads in the system when moving the power unit on the pillows of the supports and to prevent the transmission of vibration from the exhaust system to the body, the exhaust pipe is connected to the converter flange through a movable hinge, the seal of which is a toroidal metal-graphite ring 11.
The downpipe is secured to the exhaust manifold studs through a gasket 2.
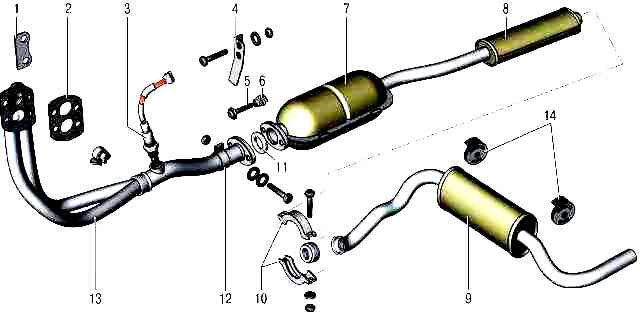
Stop plates 1 are installed under the nuts for fastening the front pipe.
The second end of the exhaust pipe is attached to the bracket 4 through the bracket 12, mounted on the gearbox cover. The converter 7 and the additional silencer 8, together with the pipe connecting them, are a non-separable unit.
The main silencer is suspended from the base of the body through rubber cushions 14 and, like the resonator and the additional silencer, together with the pipes forms a non-separable unit.
To remove and install system nodes, you will need: keys "for 8", "for 10", two keys "for 13".
If it is impossible to replace a defective assembly with a new one, you can temporarily restore its performance by applying a metal patch to the damaged area and securing it with clamps or wire.
It is recommended to place a sheet of asbestos under the patch.
In addition, parts stores sell special kits for rebuilding exhaust system components, with which you can temporarily repair damage to the system in order to get to a car service or garage.
Vehicles produced since 2009 have slightly different exhaust system elements.
Replacing the main muffler suspension pads
Replace any torn, cracked, or loose main muffler suspension pads.
Both pillows are fixed in the same way and change with the same techniques.

Slide the cushion forward along the grooves of the body bracket until its flange comes out of the bracket and remove it from the suspension bracket welded to the muffler

Install the new cushion in the reverse order of removal.
Lubricate the muffler bracket with soapy water to make it easier to install the cushion
Replace the second pillow in the same way
Replacing the main muffler

Remove the nuts of the two clamp bolts securing the muffler pipe to the additional muffler and remove the clamp.

Disconnect the pipe and muffler and remove the O-ring (shown by arrow)


Slide the pillows in the grooves of the brackets on the body until they are separated from the brackets and remove the muffler together with the pillows
If necessary, remove the cushions from the muffler brackets.
Install the new muffler in the reverse order of removal. At the same time, to facilitate the installation of pillows on the muffler and body brackets, grease the pillows with soapy water.
Replacing the converter and additional silencer
The converter and the additional muffler together represent an integral unit, which can be replaced in its entirety in the event of failure of any of its elements.
Interruptions in the operation of the ignition system can cause the catalytic converter to fail.
A catalytic converter malfunction may be one of the reasons for a sharp increase in the CO content in the exhaust gases.
Contact a specialist workshop for a more precise check of the catalytic converter before replacement.
The converter heats up to a very high temperature during operation (over 600 ° C), so it will cool down more slowly than other components of the exhaust system.
Try not to leave the car on areas with dry grass and leaves. The temperature of a very hot neutralizer may be enough to set fire to them.

Unscrew the two bolts securing the converter to the exhaust pipe and, holding the converter, remove the bolts with springs.
Unscrew the nuts of the two clamp bolts securing the additional muffler to the main muffler pipe and remove the clamp.
Disconnect the pipe and muffler and remove the converter unit with additional muffler from the vehicle
Install the new catalytic converter and additional muffler assembly in the reverse order of removal.
At the same time, replace broken or sagging resonator mounting springs and a heavily compressed metal-graphite o-ring in the connection of the additional muffler and the main muffler pipe.
Replacing the downpipe
Remove the anti-roll bar of the front suspension, as it prevents the removal of the exhaust pipe (see "Removing and installing the anti-roll bar").

Disconnect the oxygen sensor harness from the engine harness.

Unscrew the oxygen sensor from the downpipe.

Unscrew the nut of the coupling bolt of the front pipe bracket to the bracket and remove the bolt.

If it is necessary to remove a damaged bracket, unscrew the two nuts securing it to the gearbox.

Remove the top mounting bolt of the front intake pipe strut and move the strut forward


Bend the edges of the two locking plates and unscrew the four nuts securing the downpipe to the exhaust manifold.
Remove the two bolts securing the converter to the exhaust pipe and remove the bolts with springs.

Remove the downpipe by turning it along the axis.

If the metal-graphite O-ring remains on the downpipe, remove it and install it on the new downpipe. Replace damaged ring
Replace a torn or burnt downpipe flange gasket.
Screw the oxygen sensor into the new downpipe.
Install downpipe in reverse order of removal.
After installing the pipe, lock the nuts securing it to the exhaust manifold by bending the edges of the locking plates.
Reinstall the anti-roll bar.
Replacing thermal screens
The exhaust system heats up to a high temperature when the engine is running.
Therefore, in case of mechanical damage or severe corrosion of the thermal screens installed between the elements of the system and the base of the body, be sure to replace them.
In addition to reducing the level of comfort in the cabin, a malfunction of thermal screens can lead to a fire in the thermal and sound insulation of the body floor, as the exhaust gas converter heats up to over 600 ° C.
To remove the front thermal shield, remove the converter and additional muffler.

Remove the three bolts, unscrew the three nuts securing the thermal shield and remove its rear and front parts.

Install the front thermal shield in the reverse order of removal.
To remove the rear thermal shield, remove the main muffler.
Unscrew the four nuts that secure the screen to the base of the body, the two bolts that secure the screen amplifier to the body cross member and remove the screen.

If necessary, disassemble the rear thermal screen by unscrewing the nuts of the four bolts securing the amplifier, and remove the amplifier
Assemble and install the rear thermal shield in reverse order.
")
")
")
")
")
")