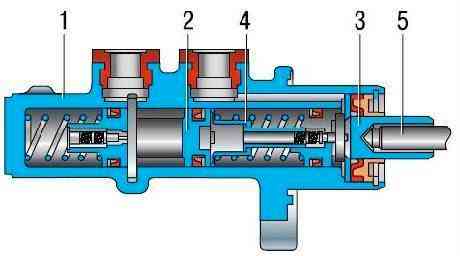
Master cylinder (Fig. 1) with sequential pistons
A tank is fixed to the body of the main cylinder, in the filler neck of which a sensor for insufficient brake fluid level is installed.
The main cylinder is not collapsible and cannot be repaired.
In case of failure, a replacement is required.
Removing and installing the brake master cylinder reservoir
The tank is removed for replacement or for preventive flushing.
In addition, sometimes it is necessary to remove the tank to replace the rubber bushings holding the tank.

Disconnect the wire ends from the brake fluid level sensor

Remove the tank cap with the level sensor float.
Pull the brake fluid out of the reservoir with a rubber bulb.

Retract the cistern latches

Remove the tank.
Inspect the rubber bushings of the reservoir.
Replace torn, cracked or loose bushings
Install the reservoir in the reverse order of removal.
Removing and installing the brake master cylinder
The main brake cylinder is removed for its replacement, as well as when removing the vacuum brake booster.
You will need: keys "for 10", "for 13".

Remove the two nuts securing the pipelines to the cylinder, disconnect the pipelines from the cylinder and take them to the side.
Cover the holes in the piping.

Unscrew the two nuts securing the cylinder to the vacuum booster housing.

Remove the cylinder
Install the brake master cylinder in the reverse order of removal.
Bleed the hydraulic brake drive (see "Changing Niva Chevrolet brake fluid").
")
")
")
")
")
")