In order to compensate for the thermal expansion of the valve relative to the valve lever, a gap between the end face of the valve end and the lever
With an increased gap, the valve will not open fully, with a reduced gap, it will not close completely.
We check and adjust the gaps when a characteristic knock of the valves appears. A loud knock at the top of the cylinder head.
Be sure to adjust the gaps after repairing the cylinder head.
Gaps should be measured on a cold engine, approximately 20˚ C.
Clearance should be 0.2 +0.05mm for inlet valves. For exhaust valves, the clearance should be 0.4+0.05 mm.

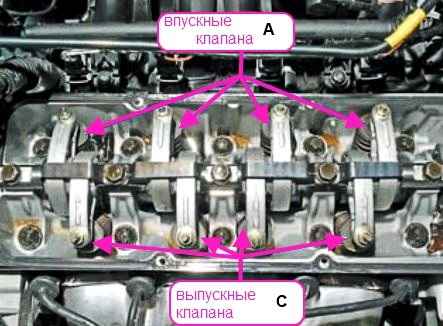
The inlet valves are closer to the windshield relative to the body of the Largus car.
A row of exhaust valves is closer to the radiator of the engine cooling system.
To measure the valve clearances, remove the cylinder head cover in the article How to replace the gasket of the cylinder head cover of the K7M engine
We unscrew the spark plugs to make it easier to scroll the crankshaft.
Remove the top cover of the timing drive and set the top dead center of the first cylinder at the end of the compression stroke (see the article on replacing the timing belt).
We take into account that the first cylinder is located next to the flywheel. The order of operation of the cylinders is 1-3-4-2.
The clearances on this engine are adjusted in pairs, if you set the TDC of the first cylinder, then we adjust the clearances on the intake and exhaust valves of the first cylinder.
Then we turn the crankshaft clockwise by 180˚, and adjust the clearances in the third cylinder, etc.

We check the gap with flat feelers between the ends of the valve stem and the adjusting screw. The probe should move in the gap with little effort.
If the gap is different, then use a 10 key to loosen the locknut of the adjusting screw, holding the screw from turning by the flats (you can use an adjustable wrench as in the photo).
Then, by turning the adjusting screw, we set the desired gap.
Tighten the locknut while holding the adjusting screw with a wrench.
Check the gap again and repeat the adjustment if necessary.
After adjusting the clearances in all cylinders, you need to turn the crankshaft again and check the clearances again.
After adjusting the valve clearances, we assemble all the parts in reverse order.
Start the engine and warm it up.
Listening to the operation of the valves. The sound of the engine should be smooth, without knocks and puffs.
")
")
")
")
")
")